
How to Sell Woodworking Plans Online: The Complete Step-by-Step Guide
You already know how to build things. This guide shows you how to turn that knowledge into downloadable plans that sell while you are out in the shop, from choosing a niche to getting your first happy customers.
Why Woodworking Plans Sell So Well Online
Every weekend, thousands of people walk into a hardware store with a half-formed idea: a bookshelf, a farmhouse table, a toy chest for a new grandchild. What they do not have is a trustworthy set of instructions. They search online, find a blurry photo with no measurements, and give up. That gap between the idea and the result is exactly where a good plan earns its price.
Woodworking plans are one of the cleanest digital products you can sell. There is nothing to ship, nothing to stock, and no per-sale cost beyond a small platform fee. You build the project once, document it carefully, and the same PDF can be downloaded a hundred times. Compare that to selling finished furniture, where every sale costs you lumber, shop hours and shipping headaches. Plans are the scalable side of the craft.
Demand is steady for a few reasons. Home improvement and DIY culture keep growing, rising lumber prices push people toward projects they can build themselves, and short-form video has made woodworking look achievable to people who have never held a saw. Buyers range from complete beginners who want a first project to experienced makers who simply do not want to redo the math for a project someone else has already solved. If you have read our primer on what woodworking is or our walkthrough for starting with no experience, you know how big that beginner audience is.
What a plan buyer is really paying for
People rarely pay for lines on a page. They pay for certainty. A strong plan removes three fears: the fear of wasting expensive lumber, the fear of a design that does not hold together, and the fear of being stuck halfway with no idea what comes next. When your plan includes a complete cut list, a shopping list, clear assembly order and honest notes about difficulty, you are selling confidence, and confidence is worth far more than a few sheets of paper.
Plans versus other woodworking income
| Income path | Upfront cost | Time per sale | Scalability |
|---|---|---|---|
| Selling finished furniture | High (materials, tools) | Many hours | Limited by your hours |
| Craft fair items | Medium | Hours per batch | Limited by events |
| Digital woodworking plans | Low once built | Near zero after launch | High |
| Video courses | Medium to high | Near zero after launch | High, but heavier to produce |
If you are weighing whether to go further and turn your craft into a full operation, our guide on how to start a woodworking business covers the bigger picture. Plans can be the first product in that story, or the whole story.
Not sure what a professional plan looks like? Browsing a few published plan books is the fastest way to study layout and tone.
Browse Woodworking Plan BooksChoose a Niche You Can Actually Own
The biggest mistake new plan sellers make is trying to appeal to everyone. A listing titled “Woodworking Plans” competes with thousands of others and says nothing. A listing titled “Compact Fold-Down Workbench for Small Garages” speaks to one specific person with one specific problem. Narrow beats broad, especially when you are starting out.
Start by listing what you genuinely know how to build. Then check each idea against three questions. Does anyone search for it? Is the competition manageable? Can you explain the build clearly? Good niches often sit where skill level, space and purpose meet: beginner-friendly storage, outdoor furniture for small patios, kids’ furniture, shop jigs, planters, pet furniture, or seasonal decor.
Ways to research demand
- Marketplace search bars. Type a project idea into a marketplace and note what auto-suggest offers. Those suggestions reflect real searches.
- Pinterest. Search a project and see how many saves similar pins have. High saves usually mean sustained interest.
- Competitor listings. Look at the best-selling plans in a niche, read their reviews, and note what buyers praise and complain about. The complaints are your opportunity.
- Forums and groups. Notice what questions beginners ask repeatedly. A repeated question is an unsolved problem.
Shop projects are an underrated niche because the buyer is already a woodworker with a budget for improvement. Plans for a woodworking workbench, a mobile tool stand or a sharpening station are evergreen. If you want to see how a popular category is already covered, compare it against the options in our roundup of the best woodworking workbench designs, and look for a gap you can fill.
Research tip: a good reference book on furniture design helps you spot patterns in what people want to build.
See Furniture Design BooksDesign the Plan: Dimensions, Joinery and Materials
Great plans start as great designs. Before you write a single instruction, decide the final dimensions, the joinery, the lumber and the finish. Good designs are not just attractive; they are forgiving. They use common lumber sizes, minimize waste, and avoid requiring a tool most buyers do not own.
Choose joinery that matches your audience
Joinery is where your plan reveals who it is for. Pocket holes and screws suit beginners and sell widely because they need minimal tools. Mortise and tenon, dovetails and half laps suit experienced buyers who want heirloom results. If your design uses a dado or rabbet, take a moment to explain them, or point readers to resources like our explainers on what a dado is and what a rabbet is. A reader who understands the joint is a reader who finishes the project and leaves a good review.
Design for the lumber store, not the drawing board
A dimension that looks neat on paper can be a nightmare at the lumberyard. Nominal sizes are not actual sizes, so a “2×4” is really closer to 1.5 by 3.5 inches. Plan around actual dimensions, and design so parts can be cut efficiently from standard board lengths and plywood sheets. Customers notice when a plan wastes half a sheet of plywood, and they remember when it does not.
Tools and software for drafting
| Method | Best for | Learning curve |
|---|---|---|
| Graph paper and pencil | First sketches and quick ideas | None |
| Free 3D modeling software | Clear isometric and exploded views | Moderate |
| Parametric CAD software | Complex designs and size variations | Steeper |
| Cut-list optimizers | Reducing waste from sheet goods | Low |
A 3D model is worth the effort. It lets you test fit before you cut, produce clean exploded diagrams, and extract accurate part dimensions. Even a free program is enough to produce professional-looking views.
Accurate measuring tools make drafting and testing far less frustrating.
Shop Measuring and Marking ToolsBuild the Project and Document Every Stage
Never sell a plan you have not built. Building the project exposes every flaw: the measurement that is off by an eighth, the step that needs a clamp you forgot to list, the finish that stains unevenly. Your build is quality control, and it is also your photo shoot.
Build with a notebook beside you
Keep a running log while you work. Record the real time each stage takes, every tool you reach for, every screw size, and every moment you hesitated. Hesitation points show you where a beginner will get stuck. If you found a step confusing even though you designed the piece, your readers will struggle too.
Photograph for instruction, not decoration
Beautiful finished photos sell the plan, but step photos make it usable. Capture each stage from a consistent angle with good, even light. A clamp in the right position, a close-up of a joint, a fence set to the correct width: those images answer questions before a customer thinks to ask them. A simple tripod and a clean background do more for plan quality than expensive gear.
Your shop setup matters here too. A tidy, well-lit space makes cleaner photos and a smoother build. If you are still organizing the space, our guide to setting up a beginner woodshop offers a practical layout, and our list of the best woodworking tools helps you decide which tools your plan should assume. If your design relies on a shop-made helper, explain it simply and link to a primer such as what a jig is in woodworking.
Benefits of building first
- Catches measurement errors
- Produces authentic photos
- Reveals realistic time estimates
- Builds your credibility
Trade-offs
- Takes time and materials
- May require rebuilds
- Needs organized note-taking
A sturdy tripod keeps your step photos consistent from the first cut to the final finish.
Find a Camera or Phone TripodPackage Everything Into a Professional PDF
Your PDF is the product. Customers will never meet you, so the document has to do all the talking. A clean, logical layout signals quality immediately and reduces support emails later.
What every plan should include
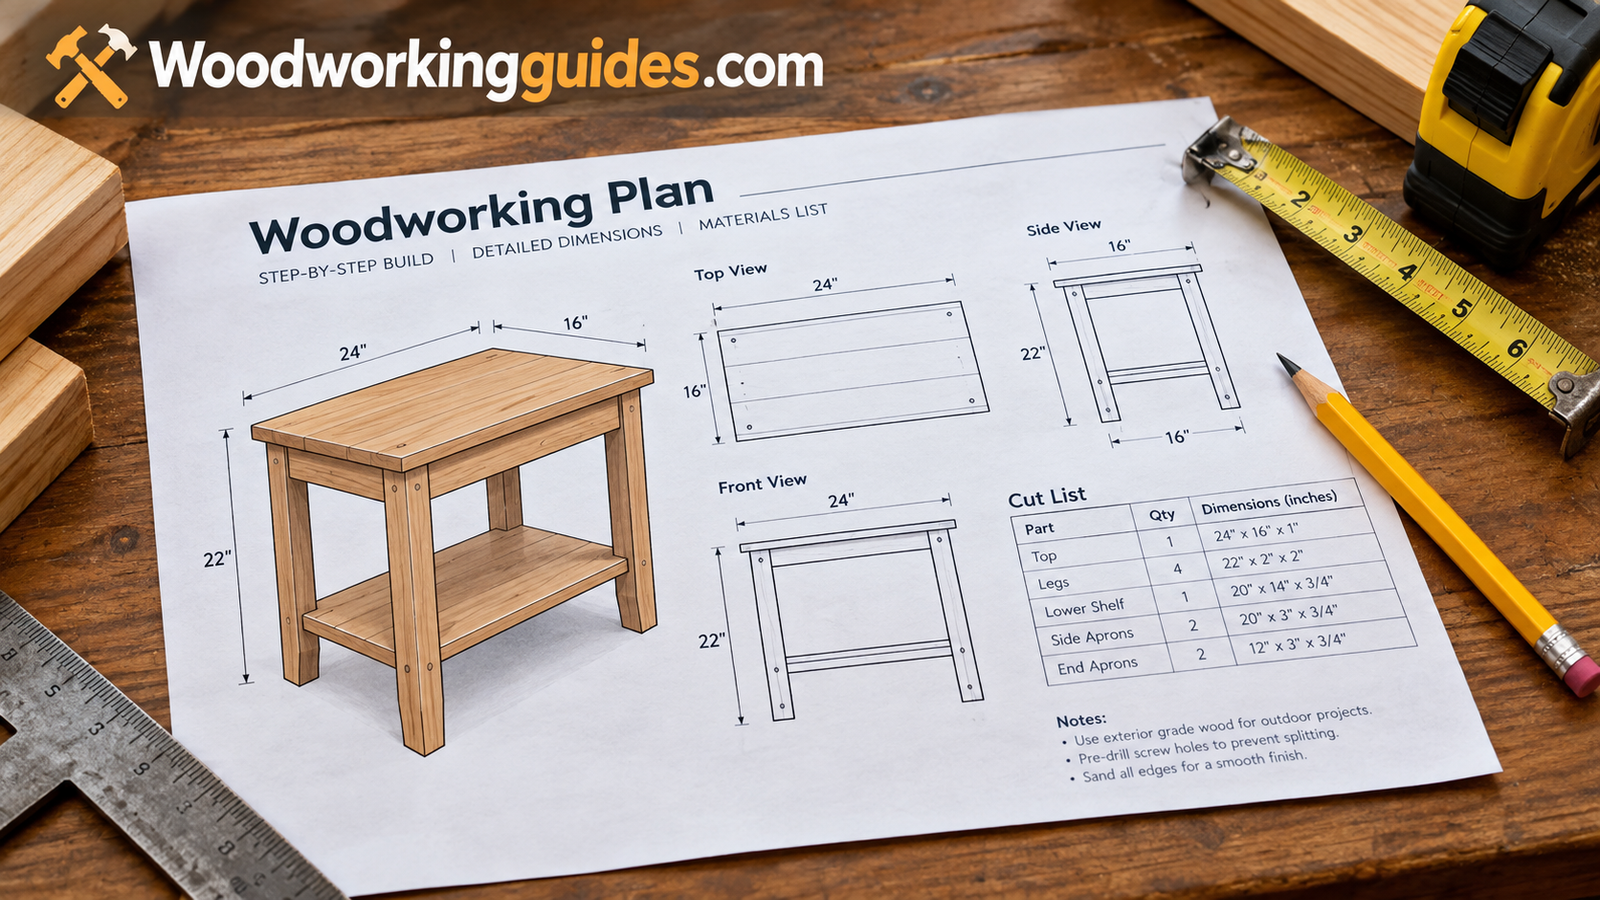
- Cover page with the finished project photo, name, skill level and overall dimensions.
- Overview covering build time, estimated cost range and what the buyer will learn.
- Materials and hardware list with quantities, sizes and lumber types.
- Tool list separated into required and optional.
- Cut list with labeled parts, dimensions and quantities.
- Diagrams including an exploded view and individual part drawings.
- Numbered assembly steps with photos or illustrations.
- Finishing guidance and care notes.
- Safety notes and a short disclaimer.
Choose a clean font, keep consistent spacing, and give every page a header and page number. Use US customary units with metric equivalents if you can, since global buyers appreciate it. Keep file size reasonable so downloads are fast, and make sure the PDF prints well on standard letter and A4 paper. Many buyers print plans and carry them into the shop, so high contrast and generous margins matter.
If your design is a bench or a shop fixture, bonus content such as wood selection advice adds real value. A short section pointing readers toward the best wood for a woodworking bench can help them make informed choices without you rewriting the topic.
A quiet, reliable printer helps you proof every page of your plan before it goes live.
Compare Home PrintersPick the Right Platform to Sell On
Where you sell shapes how much you earn and how much work you do. Marketplaces bring built-in traffic but take fees and give you less control. Your own store gives you ownership of the customer relationship but demands that you bring the traffic. Most successful sellers start on a marketplace and add their own site as they grow.
| Platform type | Typical strength | Typical drawback |
|---|---|---|
| Handmade and craft marketplaces | Large audience actively shopping for patterns and plans | Listing, transaction and ad fees; heavy competition |
| Digital product platforms | Simple checkout, instant delivery, easy to start | Smaller built-in audience; you bring the traffic |
| Ecommerce store builders | Full branding and flexibility, email integrations | Monthly subscription and more setup |
| WordPress with a digital downloads plugin | Best for blog-driven traffic and long-term ownership | You manage hosting, security and updates |
Fees and terms change often, so check each platform’s current pricing before you commit. The cheapest option on paper is not always the cheapest in practice once you count payment processing, ads and your own time.
A sensible starting path
If you are brand new, a marketplace or digital product platform gets you listed in an afternoon. If you already have a blog or a following, a WordPress store makes sense because your content can feed it directly. Whichever you choose, make sure delivery is automatic. Customers expect to download the file the moment they pay, and manual delivery will exhaust you the first time sales spike.
Running a store is easier with a dependable laptop that handles design software smoothly.
Shop Laptops for Design WorkPrice Your Woodworking Plans With Confidence
Pricing feels personal, which is why new sellers undercharge. A plan that took you forty hours to design, build and document is not worth a couple of dollars. At the same time, price is a signal. Too low can suggest low quality; too high without proof can stall sales. Your job is to land where value and trust meet.
Factors that justify a higher price
- Project size and complexity
- Completeness: cut lists, exploded views, shopping lists, step photos
- Whether you built and tested the piece yourself
- Included extras such as a template, a 3D model file or a video walkthrough
- The uniqueness of the design
| Plan type | Typical approach | Notes |
|---|---|---|
| Small projects (boxes, planters, shelves) | Low price, often sold in bundles | Volume play; great for first products |
| Furniture (tables, benches, beds) | Mid price | Strong value when plans are detailed |
| Large or advanced builds (workbenches, sheds, cabinets) | Higher price | Buyers expect extensive documentation |
| Bundles | Discount versus individual plans | Raises average order value |
Research what similar plans charge, then position yourself honestly. If your plan is more complete than the competition, price accordingly and show why. A comparison of what is included, listed clearly in your product description, justifies the difference without needing to say a word about price.
Launch pricing and testing
Launch discounts work, but use them thoughtfully. A short introductory price can generate your first sales and reviews, which in turn build social proof. Afterward, move to the regular price and watch the numbers. If views are high but sales are low, the price or the listing may be the issue. If sales are strong at your current price, consider a modest increase. Pricing is a test, not a verdict.
Track your numbers from day one. A simple notebook or planner makes it easy to log costs, prices and results.
See Small Business PlannersWrite a Listing That Converts Browsers Into Buyers
Your listing is your storefront. It has a few seconds to answer the visitor’s biggest question: “Will this plan help me build this thing successfully?” Every photo, heading and sentence should push toward yes.
Write a title people actually search
Lead with the project and the audience. “Farmhouse Coffee Table Plans, Beginner-Friendly PDF With Cut List” tells a buyer and a search engine exactly what this is. Avoid cute, vague names that hide the product. Use natural phrasing rather than stuffing keywords, because platforms and readers both notice.
Show the plan itself
Buyers worry about hidden quality. Include preview pages: a cover, a cut list, an exploded diagram and a sample step. Seeing the real document reassures them far more than any adjective. Also state clearly what is included, the file format, the skill level, the estimated time and the dimensions of the finished piece.
Answer objections before they arise
- Tools required. List them plainly.
- Skill level. Be honest, and do not oversell.
- Materials. Describe lumber types and rough cost range.
- Delivery. Explain that the file is a digital download.
- Support. Mention how to reach you with questions.
If your plan involves tools that buyers may not own, helping them see the options builds trust. Linking out to guides, such as our comparison of hand tools vs power tools, signals that you care about the entire project and not only the sale.
Good listing photos start with good light. A simple lighting kit makes shop photos pop.
Shop Photo Lighting KitsPromote Your Plans and Build Steady Traffic
Listing a plan is not the same as selling it. Visitors do not appear magically; you create the paths that lead them to you. The good news is that woodworking is a highly visual, highly shareable craft, so every channel has something to work with.
Pinterest: the quiet powerhouse
Pinterest behaves more like a visual search engine than a social network. Pins can drive traffic for months or years. Create several pin designs per plan, showing the finished project, a before-and-after, and a materials list, each with a keyword-rich title and description. Consistency matters more than perfection.
YouTube and short video
A build video is an advertisement and a trust-builder in one. Even a short, simple video showing the finished project and a few build highlights can send viewers to your listing. Put the plan link in the description and mention it naturally in the video.
Blogging and search
A blog lets you capture people searching for project ideas, tool advice and technique explainers. A post about a project can link directly to the plan. Over time, informative content builds an audience that trusts you before they ever see a price. Posts on topics like the best table saw for woodworking or the best random orbital sander show how helpful, tool-focused content attracts exactly the kind of reader who later buys plans.
Email: the asset you own
Social platforms change their rules; an email list does not. Offer a free small plan or a shop-tip sheet in exchange for an email address. Then send new releases, discounts and helpful tips. A modest list of engaged builders is worth more than a huge crowd of passive followers.
Clean video audio makes build videos feel professional. A small microphone makes a big difference.
Shop Video MicrophonesCopyright, Taxes and Legal Basics You Should Not Skip
The legal side of selling plans is not glamorous, but a little care now prevents real trouble later. This section is general information, not legal or tax advice, and rules vary by country and region, so consider speaking with a qualified professional for your situation.
Make sure the design is yours
Sell only plans you created. Copying another designer’s plans, even with small tweaks, can lead to takedowns and worse. Drawing inspiration from a general style, such as a classic farmhouse table, is normal. Reproducing someone’s specific drawings, text or photos is not. When in doubt, design from scratch, and keep your original files and notes as proof of your process.
Protect your own work
Add a copyright notice to every page of your PDF and a short license statement. Many sellers allow buyers to build and sell finished items from the plan for personal or small-scale use, while forbidding resale or redistribution of the plan itself. Whatever your policy, state it clearly. A clear license answers a common buyer question and prevents arguments.
Include a safety disclaimer
Woodworking involves sharp tools and heavy materials. Add a plain-language note encouraging safe practices, protective equipment and proper tool use, and stating that the buyer is responsible for their own safety and results. A disclaimer does not replace good practice, but it does set expectations. If you are building the habit of safe, comfortable shop work yourself, even something as simple as the right workwear helps, as shown in our guide to the best woodworking apron.
Taxes and sales rules
- Income reporting. Plan sales are income. Keep records of sales, fees and expenses.
- Sales tax and VAT. Rules for digital products vary widely by location. Some platforms handle collection for you; others do not.
- Business structure. Many people start as sole proprietors and formalize later.
- Separate finances. A dedicated account makes bookkeeping dramatically easier.
Good records save headaches at tax time. A reliable external drive also protects your design files.
Shop Backup DrivesCustomer Support, Refunds and Plan Updates
Selling the plan is the beginning of the relationship. Buyers who feel looked after leave reviews, return for more and recommend you. Buyers who feel ignored do the opposite, and in a small business the reviews you collect are your reputation.
Answer questions quickly and kindly
Most questions are about measurements, substitutions and “what if I do not have this tool.” Keep a document of common questions and your best answers. If the same question comes up three times, improve the plan itself. Each question is a free lesson in how to make the next version better.
Set a refund policy that fits digital goods
Digital products cannot be returned, so many sellers do not offer refunds but will fix problems individually. Whatever you decide, state it plainly and follow the rules of your platform. In practice, a generous attitude toward genuine errors, such as a missing page or a corrupted file, costs little and earns loyalty.
Update plans when you learn something
Plans are living documents. When a customer spots a measurement error, fix it and send the updated file to past buyers where your platform allows. Note the revision date inside the PDF. Free updates build trust and set you apart from sellers who publish and disappear.
Good support habits
- Reply within a day or two
- Keep a library of answers
- Fix errors and notify buyers
- Ask happy buyers for reviews
Common mistakes
- Ignoring messages
- Defensive replies to feedback
- Leaving errors uncorrected
- Unclear refund terms
Encourage customers to share photos of their finished builds. User photos are social proof you could never stage yourself, and they show prospective buyers that real people can complete your plan. Many sellers invite buyers to post their builds and feature the best ones with permission.
A tidy, organized shop makes it easier to rebuild projects when you update a plan.
Shop Tool StorageScaling Your Woodworking Plan Business Over Time
Once your first few plans are live and selling, the question becomes how to grow without burning out. The beauty of digital products is that growth is mostly about adding more of what works and refining what does not.
Build a catalog, not a single product
One plan can earn a little. A catalog of related plans earns a lot more because buyers return and each product promotes the others. Focus on a theme: small-space furniture, outdoor builds, shop organization. Related plans let you cross-sell naturally, such as a bench plan alongside a matching storage cabinet. If your theme is the shop itself, helping buyers choose a work surface by pointing to guides like the best portable woodworking workbench expands your usefulness beyond a single download.
Create bundles
Bundles raise average order value and move older plans. Group three to five related plans at a discount. Customers feel they are getting a deal, and you earn more per transaction than you would from a single sale.
Add related products
- 3D model files for buyers who want to modify dimensions.
- Printable templates for curves and complex shapes.
- Video walkthroughs for visual learners.
- Custom plan services for buyers with specific needs.
Expand your content and affiliate income
As your site and audience grow, helpful content creates extra income. Tool and material recommendations earn affiliate commissions when readers buy through your links, and explainers about techniques such as wood joinery tools keep your audience learning. Always disclose affiliate relationships and recommend only what you would actually use.
Mistakes to avoid
- Selling plans you have not built or tested
- Skipping the cut list and exploded diagrams
- Choosing a niche so broad that nobody feels addressed
- Relying on a single traffic source
- Ignoring customer feedback
- Expecting instant results instead of steady growth
As your catalog grows, consider a quality tool upgrade that makes building and testing faster.
Explore Woodworking Tool SetsFrequently Asked Questions
Can you really make money selling woodworking plans online?
Yes, many woodworkers earn steady income from plans. Results depend on the quality of your designs, your niche, your listings and how consistently you promote. Most people start small and grow as they add plans and reviews.
Where is the best place to sell woodworking plans?
Beginners often start on a craft marketplace or digital product platform because of simple setup and existing shoppers. Sellers with a blog or audience often prefer their own WordPress or ecommerce store for control and lower fees. Many do both.
Do I need to build the project before selling the plan?
You should. Building exposes errors, produces authentic photos and gives you realistic time and cost estimates. Plans that were never built tend to generate complaints and refunds.
What should a woodworking plan include?
At minimum, a materials list, tool list, cut list, diagrams, numbered steps with photos or illustrations, finishing advice and a safety note. Preview pages in your listing help buyers trust what they are getting.
What software can I use to create plans?
Many sellers use free 3D modeling programs or parametric CAD software for diagrams, a cut-list optimizer for sheet goods, and a layout tool or word processor to assemble the final PDF. Start with whatever you can learn quickly.
How much should I charge for woodworking plans?
Prices vary with project size, completeness and competition. Small projects are usually priced lower, furniture in the middle, and complex builds higher. Research similar plans and price according to the value you provide.
Is it legal to sell plans for a design inspired by someone else’s work?
General styles and common designs are fair game, but copying specific drawings, text or photos is not. Create your own original drawings and instructions. If you are unsure, consult a legal professional.
Can buyers sell items they make from my plans?
That is up to you. Many designers allow small-scale sales of finished items but prohibit reselling or sharing the plan. State your license terms clearly in the PDF and the listing.
Do I need a business license or to collect sales tax?
It depends on where you live and where your customers are. Digital product tax rules vary, and some platforms collect on your behalf. Check local requirements or ask an accountant.
How do I get my first sale?
Choose a clear niche, publish a complete plan with strong photos, and share it on Pinterest, YouTube and any audience you have. A short launch price can help you collect early reviews, which make later sales easier.
How long does it take to create one plan?
A first plan can take many hours, covering design, building, photography and layout. As you develop templates and workflows, each new plan becomes faster to produce.
Should I offer free plans too?
One or two excellent free plans can build your email list and show your quality. They work best as a doorway to your paid catalog, not a replacement for it.
Conclusion: Turn Your Shop Skills Into a Plan Business
Selling woodworking plans online is not a get-rich-quick scheme, but it is one of the most realistic ways to turn skill you already have into income that does not depend on your hands being on a saw every hour. The path is clear: choose a focused niche, design a project that works, build and document it, package it into a polished PDF, list it where buyers can find it, price it fairly and promote it consistently.
Start small. Finish one complete plan, publish it, and learn from the feedback. Each plan makes the next one faster and better, and each happy customer becomes part of your reputation. Keep your standards high, support your buyers and keep building your catalog, and the results compound.
Ready to build your first plan? Gather your tools and start designing today.
Start With Great Project Books