Setting Up a Beginner Woodshop: The Complete Room-by-Room Guide
Everything you need to know about space, tools, safety, and workflow before you make your first cut.
Why Shop Setup Matters More Than Tool Count
Most people planning their first woodshop start with the wrong question. They ask, “what tools do I need?” when the better first question is, “what does my space actually allow me to do safely and comfortably?” A shop crammed with expensive tools but no room to maneuver a full sheet of plywood, no dedicated dust collection, and no logical workflow between cutting, assembly, and finishing stations will frustrate even an experienced woodworker. Meanwhile, a modest one-car garage with just a handful of well-chosen tools, organized thoughtfully, can produce excellent furniture for years.
This guide walks through the entire process of setting up a beginner woodshop in the order that actually matters: space and safety first, core infrastructure second, and tool acquisition last. By the time you reach the tool sections, you’ll already know how much room you have, what power and dust collection you’re working with, and what your realistic budget looks like — which makes every tool decision after that much easier.
If you already know you want a broad tool overview before diving into shop planning, our roundup of the best woodworking tools is a useful companion piece. But if you’re starting completely from scratch, space planning genuinely does come first, because it constrains nearly every tool decision that follows.
One thing worth setting expectations on early: your first shop layout will not be your final layout. Nearly every woodworker rearranges their space multiple times in the first year as they learn how they actually move through projects versus how they assumed they would. That’s normal, and it’s one of the best arguments for choosing mobile tool stands and modular storage over anything bolted permanently to the floor or walls before you’ve had real time to test the flow.
It also helps to think of your shop as a system rather than a collection of individual purchases. A table saw is only as useful as the outfeed support that catches long boards as they exit the cut. A router is only as safe as the lighting that lets you see the bit clearly. A dust collector is only as effective as the hose routing that actually reaches your dustiest tools. Beginners who treat each purchase in isolation often end up with a pile of capable individual tools that don’t work well together, while beginners who plan the system first tend to end up with a shop that feels calm and efficient to work in, even with fewer total tools.
There’s also a financial argument for planning before buying. Shops built haphazardly, tool by tool, in response to whatever project is in front of you that week, tend to accumulate redundant or mismatched equipment — two clamps of a size you never use together, a dust hose diameter that doesn’t match your collector’s port, an extension cord too short to reach your actual outlet. A little upfront planning, even just sketching your space and listing your first year of likely projects, prevents a surprising amount of wasted spending down the line.
Choosing and Measuring Your Space
Before buying a single tool, take an honest inventory of the space you have available. A one-car garage (roughly 12 by 22 feet) is enough for a genuinely capable hobby shop, especially if tools are on mobile bases that let you reconfigure the floor plan project by project. A basement offers better climate control and insulation from weather, but often comes with lower ceilings, narrower doorways for moving lumber and finished pieces, and less natural ventilation — all worth factoring in before committing.
Measure your space properly, including ceiling height, doorway width, and any obstructions like support posts, water heaters, or electrical panels. Sketch a rough floor plan on paper or in a free design app, and mark where outlets, windows, and doors are located. This sketch becomes your reference point for planning tool placement, especially for larger stationary tools like a table saw or miter saw station that need clearance on multiple sides for safe operation.
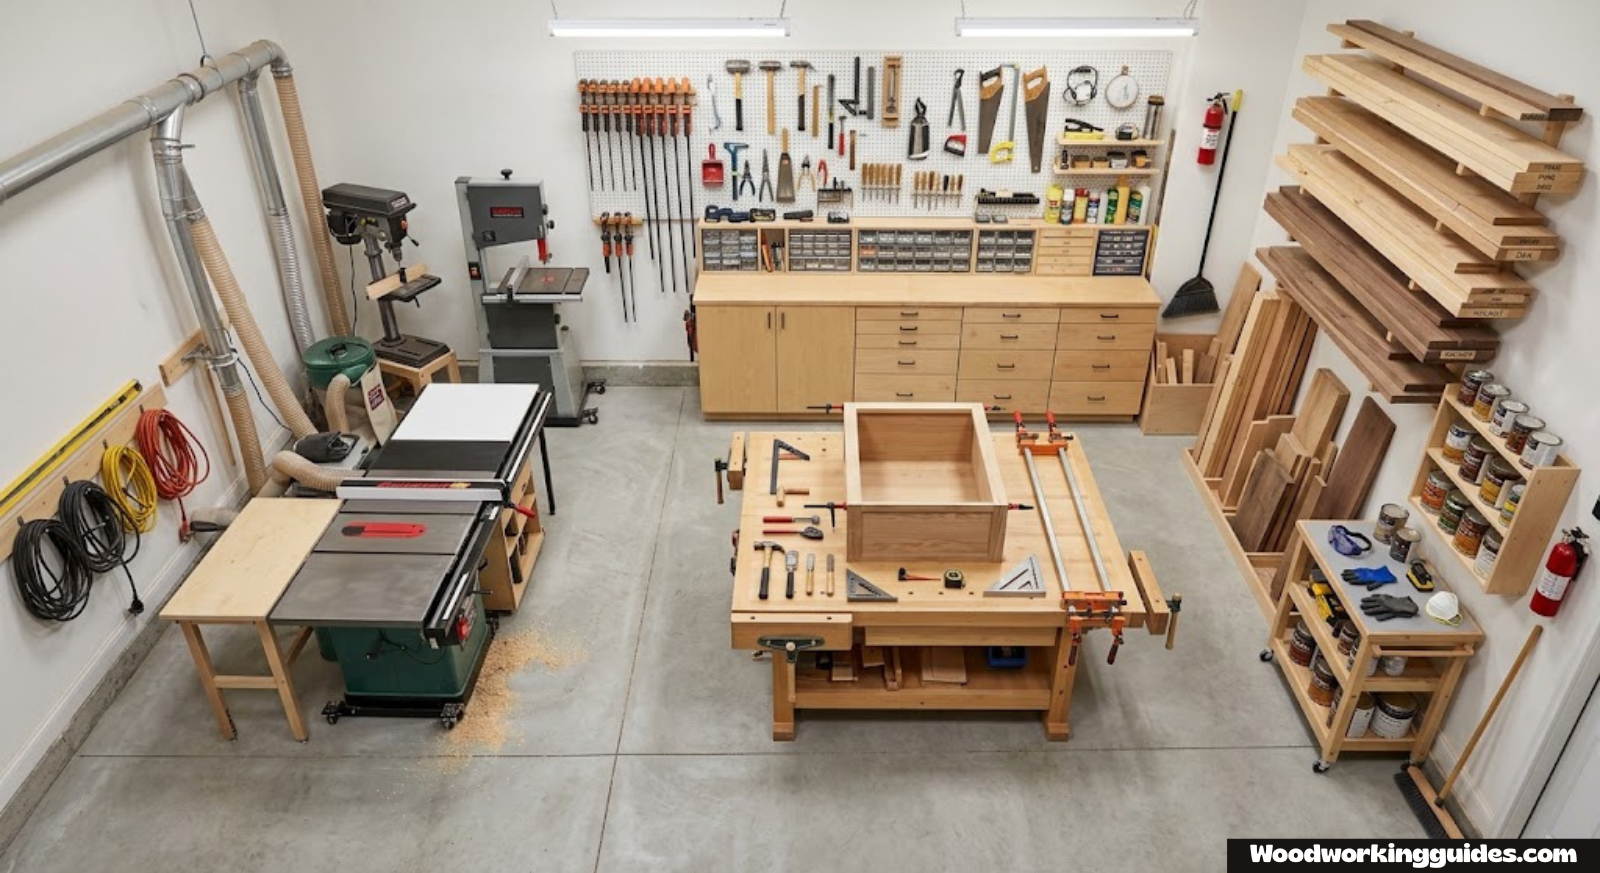
Think in terms of “zones” rather than randomly placing tools where they fit. A typical beginner shop benefits from four loose zones: a cutting zone for saws, a joinery and shaping zone for routers and sanders, an assembly zone with your workbench and clamps, and a finishing zone kept as separate as possible from dust-producing tools to avoid contaminating a fresh coat of stain or polyurethane. In a small shop these zones will overlap physically, but keeping them conceptually distinct helps you plan traffic flow and where dust collection ducting or hoses need to reach.
- Measure ceiling height, door width, and floor dimensions
- Note the location of every outlet and its amperage
- Identify a dedicated (or convertible) assembly and finishing area
- Plan clearance of at least 3 feet around major stationary tools
- Decide whether tools need to be mobile for shared-use spaces like garages
It’s worth thinking specifically about material flow, not just tool placement. A full sheet of plywood is 4 by 8 feet, and maneuvering one through a narrow doorway or around a parked car is far harder than it sounds until you’ve actually tried it. If your shop entrance is tight, plan on breaking sheet goods down closer to your vehicle or driveway before bringing them inside, or budget for a folding sheet-goods cart that makes single-person handling more manageable. Similarly, think about where finished pieces will exit the shop — a beautifully built dining table is no good to anyone if it can’t physically leave the room it was built in.
Floor surface is another detail that’s easy to overlook. Bare concrete is durable and easy to sweep, but it’s unforgiving on your knees, back, and feet during long work sessions, and it can be slippery when covered in fine sawdust. Anti-fatigue mats placed at your primary standing stations — the workbench, the table saw, the assembly area — make a meaningful difference in comfort over a full afternoon of work, and they’re inexpensive enough to add without much planning.
Finally, consider natural light alongside your electrical lighting plan. A window near your finishing area lets you check stain and topcoat color accuracy far better than artificial light alone, since LED shop lights can shift how colors appear compared to daylight. If your shop has no natural light source, it’s worth occasionally stepping outside with a finished sample to double-check color under daylight before committing to a full coat on a real project.

Browse mobile tool bases for flexible small-shop layouts.
View Mobile Tool Bases on AmazonPower, Lighting, and Ventilation
Electrical capacity is one of the most overlooked parts of shop planning, and it’s the reason many beginners end up tripping breakers the first time they run a table saw and a dust collector simultaneously. Most standard garage circuits are wired for 15 or 20 amps, which is fine for a single power tool at a time but can fall short once you’re running a saw, a shop vacuum, and lighting together. If your budget allows, having a licensed electrician add a dedicated 20-amp circuit (or a 240-volt circuit for larger stationary tools down the road) pays for itself the first time you’re mid-cut and the lights don’t flicker off.
Lighting deserves more attention than it usually gets. Dim or uneven lighting hides tearout, poor glue lines, and layout mistakes until it’s too late to fix them cheaply. LED shop lights mounted to provide even, shadow-free coverage across your bench and major tools make a dramatic difference in both safety and finished quality. A single centered ceiling fixture almost never provides enough even coverage in a garage-sized shop; plan on multiple fixtures positioned to eliminate shadows over your primary work surfaces.
Ventilation is the piece beginners underestimate most. Wood dust, and especially the fumes from oil-based finishes and some adhesives, need somewhere to go. A simple box fan in a window, positioned to exhaust rather than draw air in, makes a meaningful difference during finishing work. For dust specifically, though, ventilation alone isn’t a substitute for actual dust collection at the source — more on that in the dedicated dust and safety section further down.
| Shop Element | Minimum Recommendation | Better Setup |
|---|---|---|
| Electrical circuit | Shared 15-amp circuit | Dedicated 20-amp circuit |
| Lighting | Single overhead fixture | Multiple LED shop lights, shadow-free |
| Ventilation | Open garage door | Exhaust fan plus window airflow |
| Flooring | Bare concrete | Anti-fatigue mats at key stations |

Compare LED shop light fixtures for even, shadow-free coverage.
View Shop Lights on AmazonExtension cords deserve a brief mention too, since they’re one of the most common sources of small shop frustration. A thin, undersized cord run to a power-hungry tool like a table saw or dust collector causes voltage drop, which shows up as sluggish performance, overheating, or even premature motor wear. For any tool drawing significant amperage, use a heavy-gauge (12 or 10 AWG) cord rated for the distance and load, and keep cord runs as short as practical by planning outlet locations before you finalize your tool layout.
If your shop is in a detached garage or outbuilding without existing wiring, it’s worth having an electrician assess the full circuit before you invest heavily in tools, rather than discovering mid-project that your panel can’t support the load you’re planning to add. This is one of the few areas in shop setup where hiring a professional rather than tackling it yourself is consistently the right call, both for safety and for avoiding costly rework later.
Building Around a Workbench
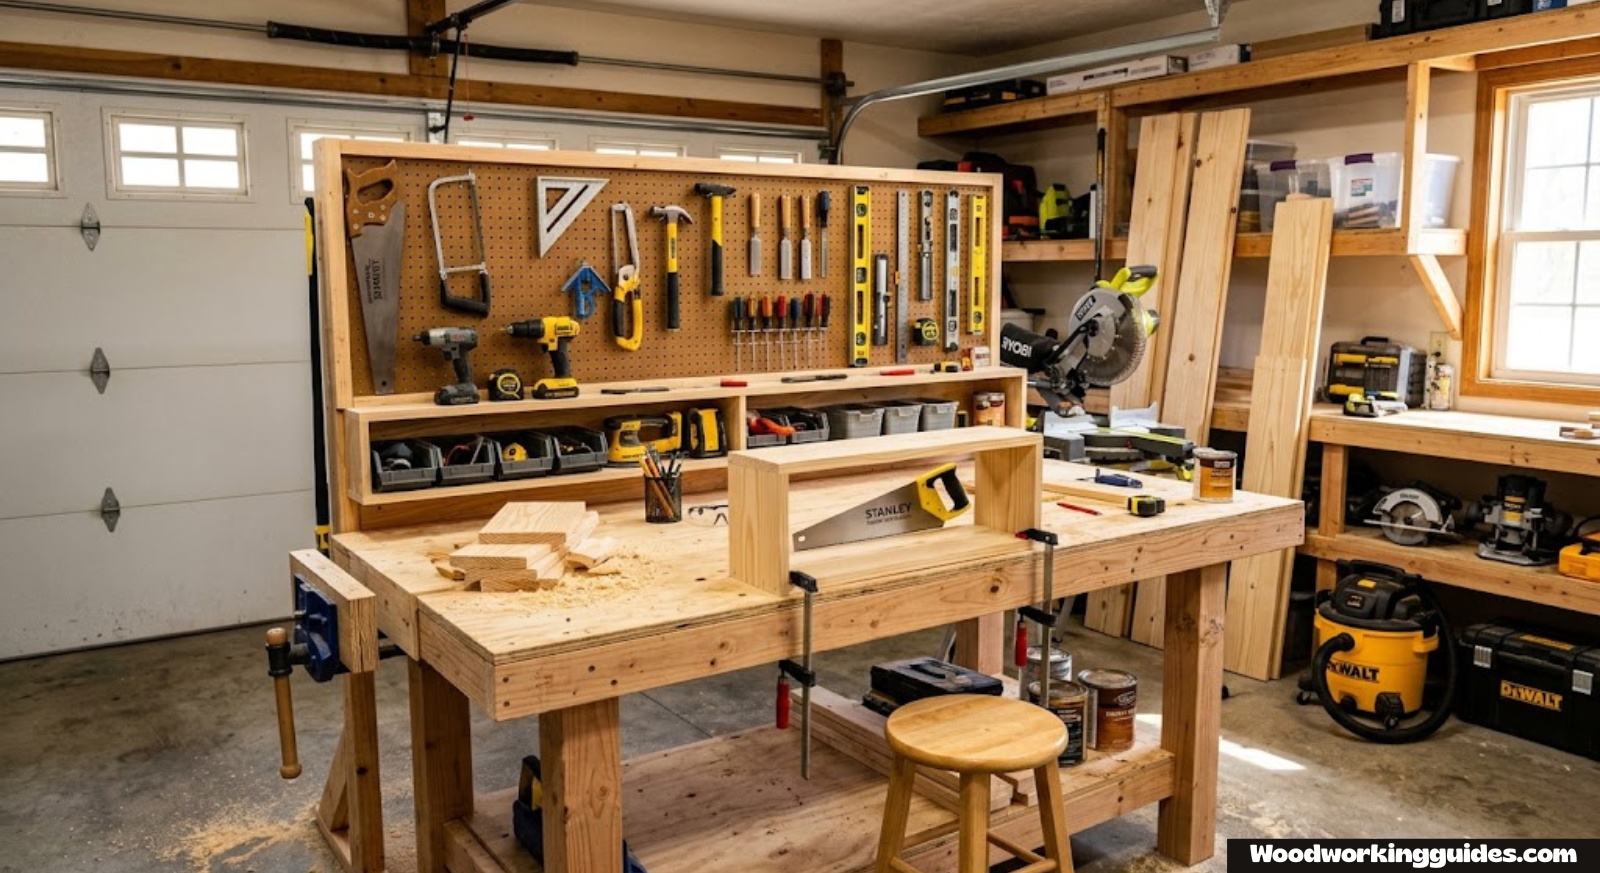
Once space, power, and lighting are sorted, the workbench is the true starting point for tool acquisition — everything else in your shop essentially supports the work that happens at this one surface. A stable bench with a flat top, a vise, and enough mass to stay put while you’re planing or chiseling changes the quality of every project that follows. For a shop that shares space with a car or needs to be broken down between sessions, a portable folding workbench with clamping jaws is a reasonable starting point, even though it won’t match a traditional bench for heavy hand-tool work.
Bench height matters more than most beginners realize. A bench that’s too tall makes planing awkward and tiring; one that’s too short causes you to hunch over detail work. A general rule of thumb is setting bench height so the top sits roughly at your wrist when standing relaxed with arms at your sides — this gives good leverage for both planing (which benefits from a lower working height) and detail joinery (which benefits from being closer to eye level).
For a closer look at sizing, top material, and build options, see our guides to the best woodworking workbench and the best portable woodworking workbench. If you’d rather build your own bench as your first project, our woodworking workbench plans PDF is a solid starting point, and it pairs well with our notes on the best wood for a woodworking bench and the best plywood for a workbench top if you’re weighing solid wood against a plywood top.
Vise placement is worth planning deliberately rather than defaulting to whatever position the bench came with. A front vise mounted near a corner gives good access for edge planing and clamping wide panels, while a tail vise or end vise works well for holding boards flat against bench dogs during surface work. If you’re building your own bench, mock up your typical working posture before committing to vise location — a vise positioned for a taller or shorter woodworker than you can make otherwise simple tasks awkward.
Bench accessories are easy to overlook but add real capability once your basic bench is in place. Bench dogs paired with a holdfast let you clamp workpieces flat to the benchtop without tying up your vise, which is especially useful during routing, chiseling, and sanding when you need both hands free and the piece needs to stay perfectly still. A simple sacrificial spoilboard, screwed or clamped to your benchtop, protects the main surface from stray drill bits and saw cuts and can be replaced cheaply once it’s chewed up.

Browse workbenches and portable clamping workstations.
View Workbenches on AmazonTool Buying in Tiers
One of the biggest mistakes new woodworkers make is trying to buy a “complete” shop all at once. Not only is this expensive, it also means you’re purchasing tools before you actually know what kind of projects you’ll gravitate toward. A tiered approach spreads cost over time and lets your purchases follow your actual project needs rather than a generic checklist.
Tier one covers the tools you’ll use on literally every project regardless of style: a workbench, a cordless drill, a combination square, a basic clamp set, and a chisel or two. Tier two adds cutting capability — a circular saw or table saw, and a miter saw for crosscuts and angles. Tier three introduces shaping and finishing tools like a router and a random orbital sander. Tier four is where dust collection, additional clamps, and specialty joinery tools come in, once you have a clearer sense of what your projects actually demand.
Our full guide to the best woodworking tools is organized around this same idea and is worth reading alongside this shop-setup guide if you want model-specific recommendations for each tier.
It’s worth naming the trap that catches so many beginners: sale pricing. Retailers, including Amazon, run frequent promotions on power tools, and it’s tempting to buy a discounted tool from tier three or four simply because the price looks good, even though your current projects don’t call for it yet. A tool bought before you need it often sits unused, sometimes for years, while taking up shop space and tying up money that could have gone toward something you’d actually use right now. A good rule of thumb: only buy ahead of schedule if the discount is genuinely exceptional and you’re confident you’ll use the tool within the next few months, not “eventually.”
The tiered approach also has a skill-building benefit that’s easy to miss. Learning one new tool category at a time lets you actually master its quirks — how your specific drill handles torque settings, how your table saw’s fence behaves under different cut widths — before adding the next layer of complexity. Woodworkers who buy everything at once often report feeling overwhelmed and under-confident with all of it, while those who build gradually tend to develop genuine proficiency with each tool as it’s added.
Essential Hand Tools for a Beginner Shop

Hand tools remain essential even in a shop dominated by power equipment, because they handle precision tasks power tools simply can’t replicate — paring a joint flush, cleaning a mortise corner, or fitting a drawer front with a whisper-thin shaving. A basic chisel set with four to six sizes covers most furniture-scale joinery. Pair it with a sharpening stone or honing guide from the start, since a dull chisel is more dangerous and less useful than a sharp one.
A hand plane, particularly a No. 4 smoothing plane, rounds out the core hand-tool kit, letting you flatten slightly cupped stock and achieve a glass-smooth surface without sandpaper. Our detailed guide on the best chisel set for beginners covers steel types and sharpening basics in more depth, and our wood joinery tools explained guide shows how chisels, planes, and marking tools work together on real joints.
Pros
- Inexpensive relative to power tool alternatives
- No electricity or dust collection needed
- Builds fundamental skill and control
Cons
- Requires sharpening maintenance
- Slower for large-scale material removal

Browse beginner-friendly chisel sets and honing kits.
View Chisel Sets on AmazonEssential Power Tools for a Beginner Shop

Once space and workbench are sorted, cutting capability is usually the next major investment. A table saw handles the widest range of rip cuts, crosscuts, and joinery, making it the anchor tool for most shops. If floor space or budget is tight, a quality circular saw with a straightedge guide can substitute early on, though it won’t match a table saw’s repeatability for cabinet-scale work.
A miter saw complements a table saw well by handling fast, accurate crosscuts and angled cuts for trim and furniture components. A cordless drill/driver rounds out the core power tool kit, used constantly for pilot holes, driving screws, and countersinking. See our dedicated guides to the best table saw for woodworking, the best miter saw for home shop, and the best cordless drill for woodworking for model-level comparisons, and how to choose a table saw if you’re still weighing benchtop versus contractor versus hybrid options.
If you’re deciding how much to lean on power tools versus building a more traditional hand-tool-forward shop, our comparison of hand tools vs. power tools for woodworking lays out the trade-offs in detail.
Pros
- Dramatically faster than hand-tool equivalents
- More consistent results across repeated cuts
- Scales well from hobby to serious furniture work
Cons
- Higher upfront cost than hand tools
- Requires more safety training and dust management

Compare cordless drill and driver combo kits for a first shop.
View Cordless Drills on AmazonMeasuring and Layout Tools

Accurate layout work is the quiet foundation that everything else in woodworking depends on, and it’s an area where spending a little more up front pays off for years. A quality combination square checks for square edges, marks consistent lines, measures depth, and doubles as a straightedge. A reliable tape measure, a marking gauge for consistent parallel lines, and a sharp marking knife (which produces a cleaner, more accurate line than a pencil for joinery work) round out a solid layout kit.
Cheap squares flex and drift out of true within weeks of regular use, which quietly throws off every cut and joint that follows without an obvious cause. Investing in a single quality combination square early is one of the best value-per-dollar decisions in a beginner shop.

Browse combination squares and marking gauges built for accuracy.
View Layout Tools on AmazonClamping and Assembly Gear

Clamps quietly do more work than almost any other tool category, and running short mid-glue-up with fast-setting wood glue is a genuinely stressful experience every woodworker eventually learns to avoid. A mixed set of parallel-jaw bar clamps for panel glue-ups, quick-grip clamps for fast one-handed work, and smaller spring clamps for detail tasks covers the vast majority of assembly needs in a beginner shop.
Buy more clamps than feels necessary. Nearly every woodworker underestimates how many they’ll need for their first real glue-up, and scrambling to finish a joint before glue sets because you’re one clamp short is an entirely avoidable problem.
Browse parallel-jaw and quick-grip clamp sets for glue-ups.
View Clamps on AmazonDust Collection and Safety Gear

Safety gear isn’t optional in a beginner shop, and it’s far cheaper than the alternative. At minimum, a beginner shop needs safety glasses, hearing protection for loud power tools, and a properly rated dust mask or respirator for sanding and cutting sessions. Fine wood dust is a genuine long-term health concern, and building the habit of protecting your lungs from day one matters more than almost any tool purchase on this list.
A basic dust collection setup, even a shop vacuum connected to your sander and miter saw, meaningfully reduces airborne particulate compared to no collection at all. As your shop grows, a dedicated cyclone-style collector connected to your major tools is worth the upgrade. A properly rated fire extinguisher, kept near your finishing area where solvents and rags are stored, is a piece of safety gear beginners frequently skip and shouldn’t.
Compare portable dust collectors and shop safety gear.
View Dust Collectors on AmazonStorage and Shop Organization
A cluttered shop isn’t just unpleasant to work in — it’s genuinely less safe, since tripping hazards and buried tools slow you down at exactly the moments precision and quick reactions matter most. Wall-mounted French cleat systems are popular among woodworkers for good reason: they let you hang and rearrange tool storage without repeatedly drilling new holes, and they keep your floor and bench surfaces clear for actual work.
Rolling tool carts and pegboard walls are similarly effective for a beginner shop, especially in shared spaces where you may need to shift things around between sessions. Keep frequently used tools within arm’s reach of your main bench, and store less-used specialty tools further away — a small detail that saves real time across dozens of projects.

A good apron keeps small tools within reach while you work — browse options below.
View Aprons on AmazonIf you want a closer look at apron material and pocket layout, our guides on the best woodworking apron and the best leather woodworking apron compare top picks side by side, and our individual reviews of the waxed canvas woodworking apron, the Rockler woodworking apron, and the Briteree woodworking apron go deeper on specific models.
Buying Your First Lumber
New woodworkers are often surprised by how much lumber selection affects project outcomes independent of tool quality. Big-box store dimensional lumber (like standard “2×4” studs) is fine for shop fixtures and rough jigs, but it’s rarely flat or dry enough for quality furniture work. Hardwood suppliers or dedicated lumber yards offer better-milled stock, though at a higher price point, and are worth seeking out once you’re ready to build something meant to last.
For a first few projects, plywood and common softwoods like pine keep costs low while you’re still building confidence and refining technique. As your skills grow, hardwoods like poplar (inexpensive and easy to work), oak, maple, and walnut open up more durable and visually refined project options.
Sample Budget Plans
Budgets vary widely depending on whether you’re buying new, shopping sales, or picking up quality used tools. The table below outlines three realistic starting points to help you calibrate expectations.
| Budget Tier | What’s Included | Best For |
|---|---|---|
| Starter | Portable bench, drill, hand tools, basic clamps | Small projects, testing interest |
| Core Shop | Table saw, miter saw, router, sander, dust collection basics | Regular furniture-scale projects |
| Established Shop | Full stationary tool lineup, dedicated dust system, expanded clamps | Serious hobbyists and small-batch builders |
Small Shop Layout Tips
In a small or shared-use shop, mobility is everything. Mobile bases under stationary tools let you push a table saw against the wall when it’s not in use and roll it back out when a project demands it. Wall-mounted folding workbenches and drop-leaf outfeed tables similarly reclaim floor space between sessions. Plan your electrical cord and dust hose routing before you settle on a final layout — tripping over a cord mid-cut is a completely avoidable hazard.
Good First Projects for a New Shop
Starting with a simple, low-stakes project builds confidence with your new tools before you commit to something more ambitious. A basic shop stool, a set of shelf brackets, a small tool tote, or a cutting board are all excellent first builds — they exercise measuring, cutting, and basic joinery without requiring advanced techniques or expensive material.
Core Skills Worth Practicing Early
Tools only get you so far without the underlying technique to use them well, and a handful of foundational skills pay dividends across nearly every future project. Learning to read grain direction — recognizing which way the wood fibers run so you can plane, chisel, and rout with the grain rather than against it — prevents tearout and makes hand tools noticeably easier to control. This is a skill best learned on cheap practice scrap rather than on the material for your first real project.
Accurate marking and measuring is another early skill worth deliberate practice. The old woodworking rule “measure twice, cut once” exists because small measuring errors compound across a project — a board cut an eighth of an inch short might not seem like much until it throws off every subsequent joint that depends on it. Practicing consistent, repeatable marking technique with your combination square and marking knife before starting a real project builds habits that prevent frustrating rework later.
Basic joinery — simple butt joints reinforced with screws or dowels, followed by pocket-hole joinery, and eventually mortise-and-tenon or dovetail joints — is worth learning in that rough order of difficulty rather than jumping straight to the most advanced technique you’ve seen online. Each joinery method builds spatial reasoning and hand-eye coordination that makes the next, harder method easier to pick up.
Finally, learning to sharpen your own edge tools is a skill that pays for itself many times over. A dull chisel or plane iron is both more dangerous (it requires more force, increasing slip risk) and less capable than a sharp one. Investing an afternoon early on to learn basic sharpening on a stone or honing guide will improve the performance of every edge tool you own for years to come.
Setting Up a Finishing Area
Finishing is often treated as an afterthought in shop planning, but a poorly set up finishing area can undo hours of careful joinery and sanding work. Dust is the enemy of a good finish — any airborne sawdust that settles into wet stain or topcoat shows up as visible grit in the final surface. For that reason, finishing should ideally happen in a separate area or at a separate time from active cutting and sanding, even if that just means clearing dust-producing tools out of the way and letting the air settle for twenty or thirty minutes before you start applying finish.
Ventilation matters even more during finishing than during general shop work, particularly with oil-based stains, polyurethanes, and lacquers that release stronger fumes. A cross-breeze from an open door and window, or a dedicated exhaust fan positioned to pull fumes away from your breathing zone, makes finishing sessions both safer and more pleasant. Water-based finishes are a reasonable alternative for shops with limited ventilation options, since they produce noticeably fewer strong fumes than their oil-based counterparts, though some woodworkers feel they don’t build quite the same depth of color on certain hardwoods.
A dedicated finishing surface — sawhorses with a simple platform, or a rotating turntable for smaller pieces — keeps your workbench free of drips and lets you access all sides of a project without repositioning it constantly. Keep a supply of lint-free rags, but store oily rags properly: rags soaked in oil-based finish can spontaneously combust if balled up and left in a pile, so laying them flat to dry outside or storing them in a sealed metal container is a genuine safety necessity, not an exaggerated precaution.
Temperature and humidity also affect finish results more than most beginners expect. Applying stain or topcoat in a cold garage can cause slow curing, uneven sheen, or a finish that never fully hardens properly. Most finish products list an ideal application temperature range on the can, and it’s worth checking before starting rather than after noticing the finish isn’t curing as expected.
Tool Maintenance Habits Worth Building Early
Tools that are cared for consistently last dramatically longer than tools that are neglected until something breaks. Building a few simple maintenance habits from the very start of your woodworking journey pays off in both tool longevity and cut quality. Blowing sawdust out of a drill’s vents after use, wiping down cast-iron table saw tops with a light coat of paste wax to prevent rust, and keeping blades and bits clean of pitch buildup are all quick tasks that take minutes but meaningfully extend tool life.
Rust is a particular concern for any shop in a humid climate or an unheated garage subject to temperature swings. Cast-iron surfaces, like a table saw top or a jointer bed, benefit from an occasional coat of paste wax or a dedicated rust-preventative spray, especially if the shop isn’t climate controlled. A simple desiccant or small dehumidifier in an especially damp shop can also meaningfully reduce rust risk on both tools and stored metal hardware.
Blade and bit maintenance deserves its own routine. A dull saw blade doesn’t just cut poorly — it also increases the force needed to push material through, which raises the risk of kickback and puts more strain on the motor. Router bits and drill bits similarly perform better and last longer with occasional cleaning to remove built-up pitch and resin, which can be done with a dedicated blade and bit cleaner or simple warm soapy water for less stubborn buildup.
Finally, keep a basic log of maintenance dates, even something as simple as a note on your phone. Knowing when you last changed a table saw blade, lubricated moving parts, or checked your dust collector’s filter helps you catch performance issues before they become bigger problems, and it takes the guesswork out of routine upkeep.
Shop Comfort Across Seasons
An unheated or uncooled garage shop can be genuinely unpleasant, or even unsafe, at seasonal extremes, and it’s worth planning for this rather than discovering it the hard way during a heat wave or cold snap. In colder climates, a portable space heater rated for the size of your shop makes winter work sessions far more tolerable, though it’s worth pairing any heater with a carbon monoxide detector if it’s fuel-burning rather than electric, and always following the manufacturer’s clearance guidelines around combustible materials like sawdust and lumber.
Wood itself is sensitive to temperature and humidity swings, which matters more than beginners often realize. Lumber acclimates to the humidity of the space it’s stored in, expanding and contracting slightly as conditions change. Building a piece of furniture from wood that hasn’t had time to acclimate to your shop’s typical humidity can result in gaps, warping, or cracking weeks or months later as the wood continues adjusting after the project is finished. Letting new lumber sit in your shop for several days to a week before working it, particularly across a big seasonal transition, reduces this risk considerably.
In hot climates or during summer months, heat can affect both comfort and material behavior — glue can set faster than expected in high heat, and finishes can dry too quickly, leading to lap marks or uneven sheen. A simple box fan for airflow, working sessions scheduled for cooler parts of the day, and glue or finish products rated for warm-weather application all help offset these seasonal challenges.
Common Beginner Mistakes to Avoid
- Buying every tool at once instead of following a tiered approach
- Skipping dust collection and safety gear to save money early
- Ignoring electrical capacity until a breaker trips mid-project
- Ignoring lighting until tearout or misaligned joints are found too late
- Bolting tool stands to the floor before testing shop flow
- Working directly from lumber without letting it acclimate to the shop
- Finishing in the same space and same session as active sanding or cutting
- Neglecting basic blade and bit maintenance until performance noticeably suffers
- Underestimating how many clamps a first real glue-up will require
- Overlooking cord gauge and voltage drop on power-hungry tools
Frequently Asked Questions
How much space do I need for a beginner woodshop?
A one-car garage, roughly 12 by 22 feet, is enough for a capable beginner shop, especially with mobile tool bases that let you reconfigure the floor plan as needed.
What’s the first tool I should buy?
A stable workbench and a cordless drill are the most universally useful starting points, since nearly every project depends on a solid work surface and basic drilling and driving capability.
Do I need a dedicated electrical circuit for my shop?
It’s not strictly required for a small starter shop, but a dedicated 20-amp circuit prevents tripped breakers once you’re running a saw alongside dust collection or additional lighting.
How much should I budget to start woodworking?
A basic starter kit with a portable bench, drill, hand tools, and clamps can be assembled affordably. A more complete core shop with a table saw, miter saw, and dust collection represents a bigger investment usually built up over time.
Is a garage or a basement better for a woodshop?
Garages typically offer better ventilation and easier dust management, while basements offer more stable climate control but often have lower ceilings and narrower access for moving lumber.
Do I need dust collection if I only work occasionally?
Yes, even occasional use benefits from basic dust collection. Fine airborne dust exposure adds up over time regardless of how often you’re in the shop.
What safety gear is essential from day one?
Safety glasses, hearing protection, and a properly rated dust mask or respirator are the non-negotiable basics for any beginner shop.
Should I buy new or used tools when starting out?
Both are reasonable. Used stationary tools like table saws can offer excellent value if properly inspected, while smaller tools like drills and sanders are often safer to buy new given wear-and-tear concerns.
How do I organize a small shop without wasting space?
Wall-mounted French cleat systems, pegboard walls, and mobile tool carts let you store tools vertically and reposition storage as your needs change, keeping the floor clear for actual work.
What wood should beginners practice with first?
Pine and poplar are inexpensive, easy to work with hand and power tools, and forgiving of small mistakes, making them ideal for early projects before moving to pricier hardwoods.
How long should lumber sit in my shop before I build with it?
Several days to a week is a reasonable minimum, especially across a seasonal transition, to let the wood acclimate to your shop’s humidity and reduce the risk of warping or gaps after the project is finished.
Should finishing happen in the same area as cutting and sanding?
Ideally not at the same time. Airborne dust from cutting and sanding can settle into wet finish and show up as visible grit, so it’s best to let dust fully settle or use a separate area before applying stain or topcoat.
Final Verdict: Build the Space First, Then the Tool Collection
A beginner woodshop comes together fastest when you plan space, power, lighting, and safety before spending on tools. Once that foundation is in place, a tiered approach to tool buying — starting with a workbench, drill, and basic hand tools, then expanding into cutting, shaping, and dust collection — keeps costs manageable and lets your purchases follow your actual project interests rather than a generic checklist.
Whatever you decide to buy first, prioritize safety gear and dust collection early, keep your layout flexible with mobile tool bases, and don’t feel pressured to build a “complete” shop before your first project. Many of the most productive shops were built one tool at a time over several years.

Ready to start outfitting your shop? Browse today’s top-rated woodworking essentials on Amazon.
Shop Woodworking Essentials on Amazon
Pingback: 12 Best Woodworking Tools: Essential Picks From Amazon