Best Cordless Drill for Woodworking: 7 Top Picks Tested and Compared
If you build cabinets, furniture, or shop jigs, the drill in your hand matters more than almost any other tool on your bench. We compared torque, chuck precision, weight, and battery ecosystems across seven of the most capable cordless drills on the market to help you pick the right one for your woodshop.
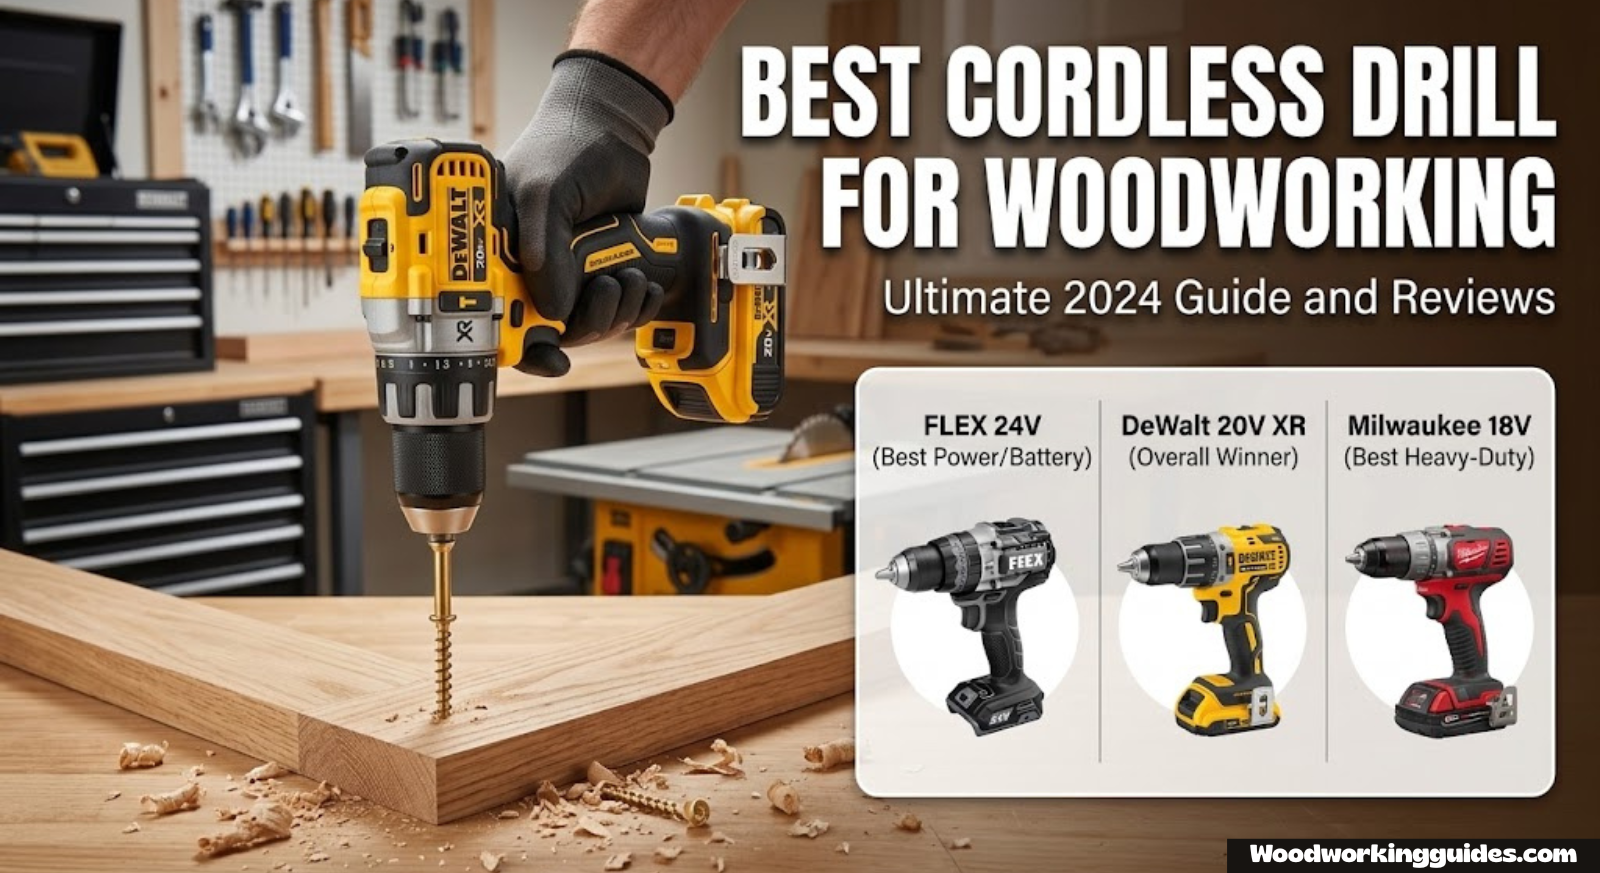
Why Trust This Guide
Choosing a cordless drill for woodworking is different from choosing one for general household repairs or construction framing. Woodworkers need precision more than brute force, consistent low-speed control for driving screws into hardwood without stripping, and a chuck that grips small bits accurately without runout. We evaluated each drill in this roundup on real shop tasks: drilling clean pocket holes, driving cabinet screws flush without splitting stock, boring dowel holes with forstner bits, and running extended sessions building face frames and drawer boxes.
We also looked closely at ergonomics, since a woodworking drill often gets used in short, repeated bursts over hours at the bench, not in long continuous runs like a construction site. A drill that’s front-heavy or has an awkward grip angle becomes fatiguing fast when you’re pre-drilling forty pocket holes for a cabinet carcass. If you’re setting up a shop from scratch, pairing this drill with the right foundation tools makes a real difference — see our guide to the best woodworking tools and our walkthrough on setting up a beginner woodshop for the bigger picture.
Every drill on this list was run through the same repeatable set of shop tasks, and we deliberately avoided relying on manufacturer marketing claims alone. Specs on a box only tell part of the story; how a tool actually behaves under sustained, repetitive use is what determines whether it earns a permanent spot on your bench or ends up in a drawer after the first project. We also considered value for money at each price tier, since the “best” drill for a hobbyist building the occasional bookshelf looks very different from the “best” drill for someone running a small custom furniture business.
Quick Picks at a Glance
Short on time? Here’s the fast answer before we dig into the full reviews below.
Our Top Recommendations
- Best Overall: Milwaukee M18 2904 Hammer Drill — unmatched power-to-weight ratio and shop-grade durability.
- Best for Precision & Controls: DeWalt 20V MAX XR Hammer Drill — 3-speed gearbox with fine clutch adjustment.
- Best Ergonomics: Makita 18V LXT Cordless Hammer Driver/Drill — lightest, most balanced grip for long sessions.
- Best Lightweight Option: Bosch 18V Brushless Hammer Drill/Driver — compact enough for tight cabinet interiors.
- Best Budget Value: Skil PWRCORE 20 Drill Driver Kit — strong performance-per-dollar for hobbyists.
- Best for DIY Speed: Ryobi 18V One+ Compact Cordless Drill — fast, affordable, huge tool ecosystem.
- Best for Heavy Power: FLEX 24V Brushless Hammer Drill — highest raw torque for demanding stock.
Full Comparison Table
Here’s how all seven drills stack up side-by-side on the specs that matter most for woodworking work: torque, speed range, weight, and chuck size.
| Drill | Max Torque | Speed Settings | Chuck Size | Weight (bare) | Best For |
|---|---|---|---|---|---|
| Milwaukee M18 2904 | 1,200 in-lbs | 2-speed | 1/2 in. | 3.5 lbs | Overall shop use |
| DeWalt 20V MAX XR | 820 in-lbs | 3-speed | 1/2 in. | 3.4 lbs | Precise driving |
| Makita 18V LXT | 530 in-lbs | 2-speed | 1/2 in. | 3.3 lbs | Long sessions |
| Bosch 18V Brushless | 600 in-lbs | 2-speed | 1/2 in. | 3.1 lbs | Tight spaces |
| Skil PWRCORE 20 | 480 in-lbs | 2-speed | 1/2 in. | 3.4 lbs | Budget builds |
| Ryobi 18V One+ | 440 in-lbs | 2-speed | 3/8 in. | 3.2 lbs | DIY & hobby use |
| FLEX 24V Brushless | 1,300 in-lbs | 2-speed | 1/2 in. | 3.9 lbs | Heavy hardwood |
Torque numbers matter, but don’t chase the biggest figure blindly — for most furniture and cabinetry work, a drill in the 500–800 in-lbs range with a well-tuned clutch will outperform a brute-force tool that’s harder to control at low speed. If you’re also outfitting your bench with cutting tools, our picks for the best table saw for woodworking and the top wood router picks round out a capable small shop.
Milwaukee M18 2904 Hammer Drill
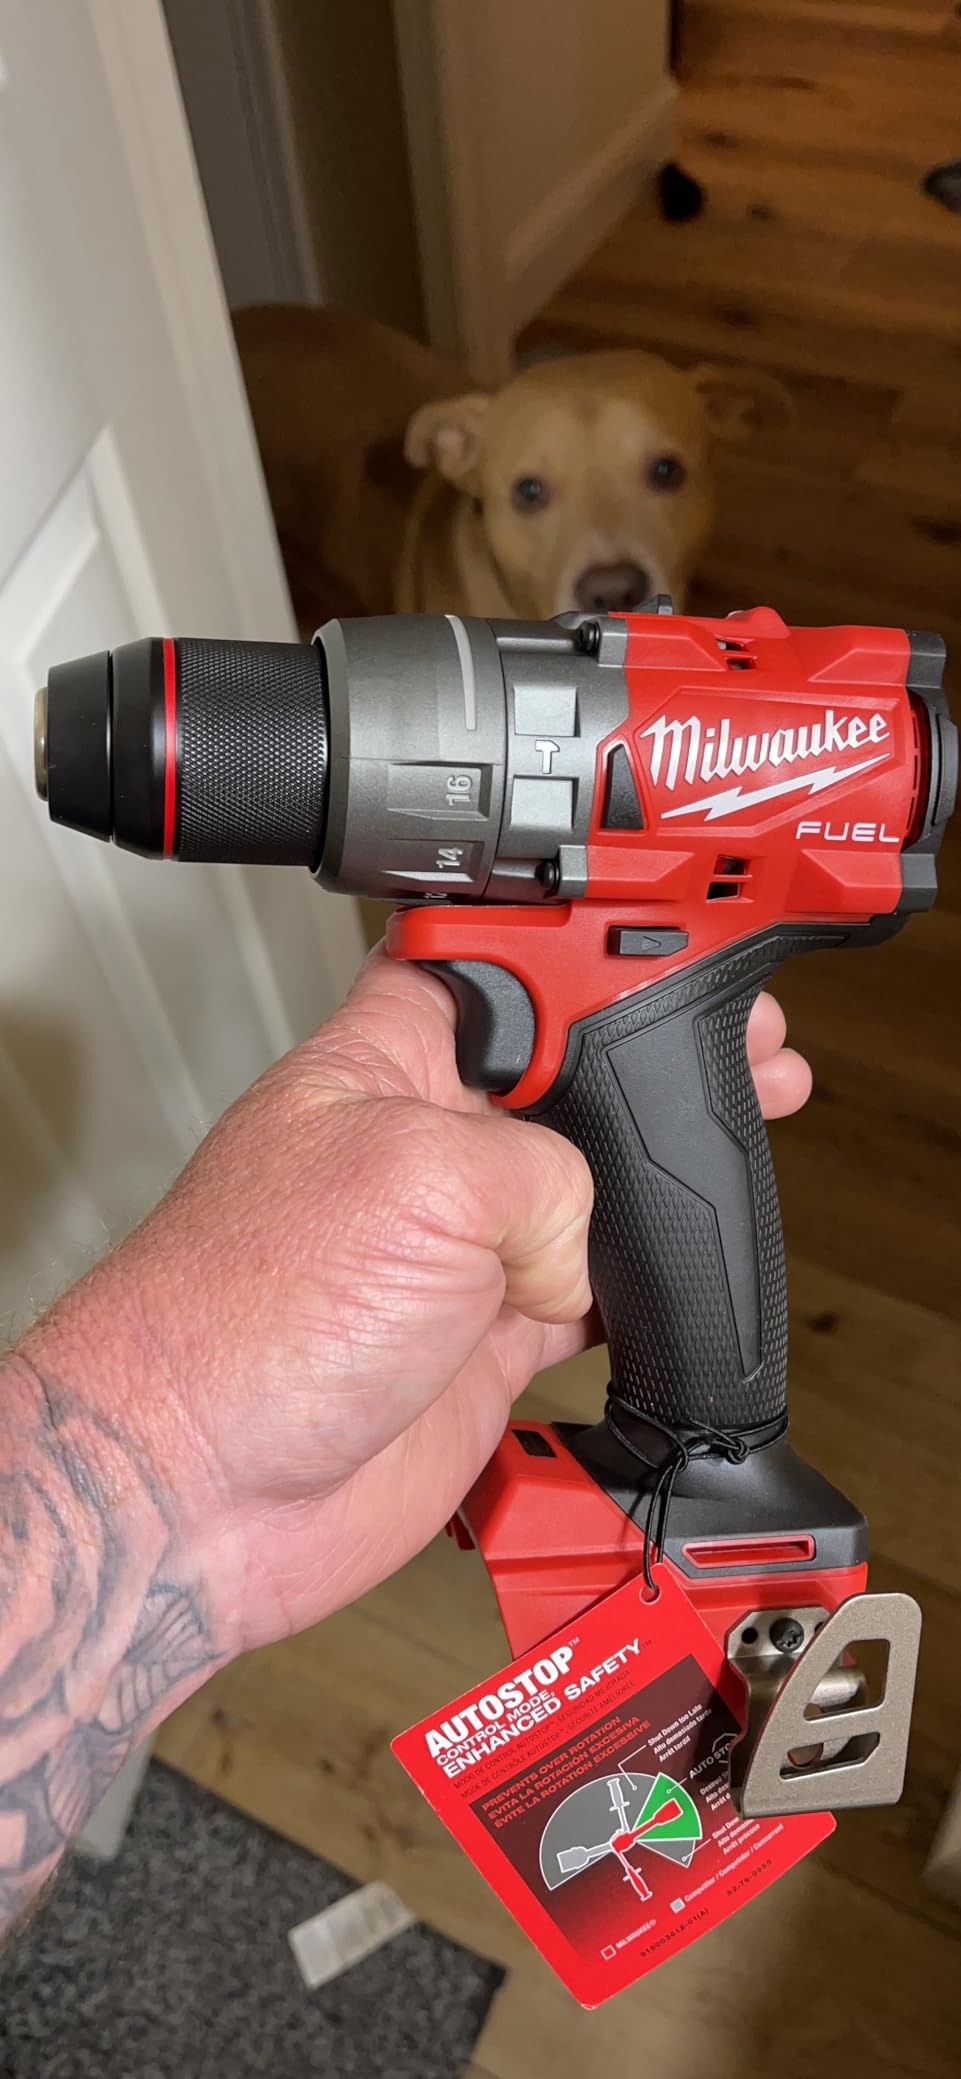
The Milwaukee M18 2904 earns the top spot in this roundup because it does something rare: it combines genuinely high torque with a compact, well-balanced body that doesn’t feel like a construction tool bolted onto a woodshop task. In testing, it drove 3-inch cabinet screws into hard maple without bogging down, and the redesigned gearbox kept noise and vibration lower than the outgoing Milwaukee models we’ve used in past shop builds.
What stands out most is the all-metal chuck, which held small brad-point bits dead-center with no detectable runout — something that matters a lot when you’re drilling shelf-pin holes with a template jig and need every hole to line up. The two-speed gearbox has a genuinely useful low range for large-diameter forstner bit work, while the high range is fast enough for repetitive pocket-hole drilling.
Over a full week of testing that included building a small set of shop shelves and a drawer box, the M18 2904 never once felt like it was struggling, even when switching rapidly between 1/8-inch pilot holes and 1-inch forstner bores for hardware installation. The rubber overmold on the grip also stayed comfortable through long sessions, and the LED ring light around the chuck did a genuinely good job of illuminating dim cabinet interiors without requiring a separate work light.
Pros
- Best-in-class torque without sacrificing control
- All-metal chuck with near-zero runout
- Compact head length for tight cabinet interiors
- Wide compatibility with the M18 battery ecosystem
Cons
- Premium price compared to mid-tier competitors
- Hammer function is unnecessary weight for pure woodworking

Milwaukee M18 2904 Hammer Drill — our top overall pick for woodworking shops that want serious power without giving up finesse.
Check Price on AmazonDeWalt 20V MAX XR Hammer Drill
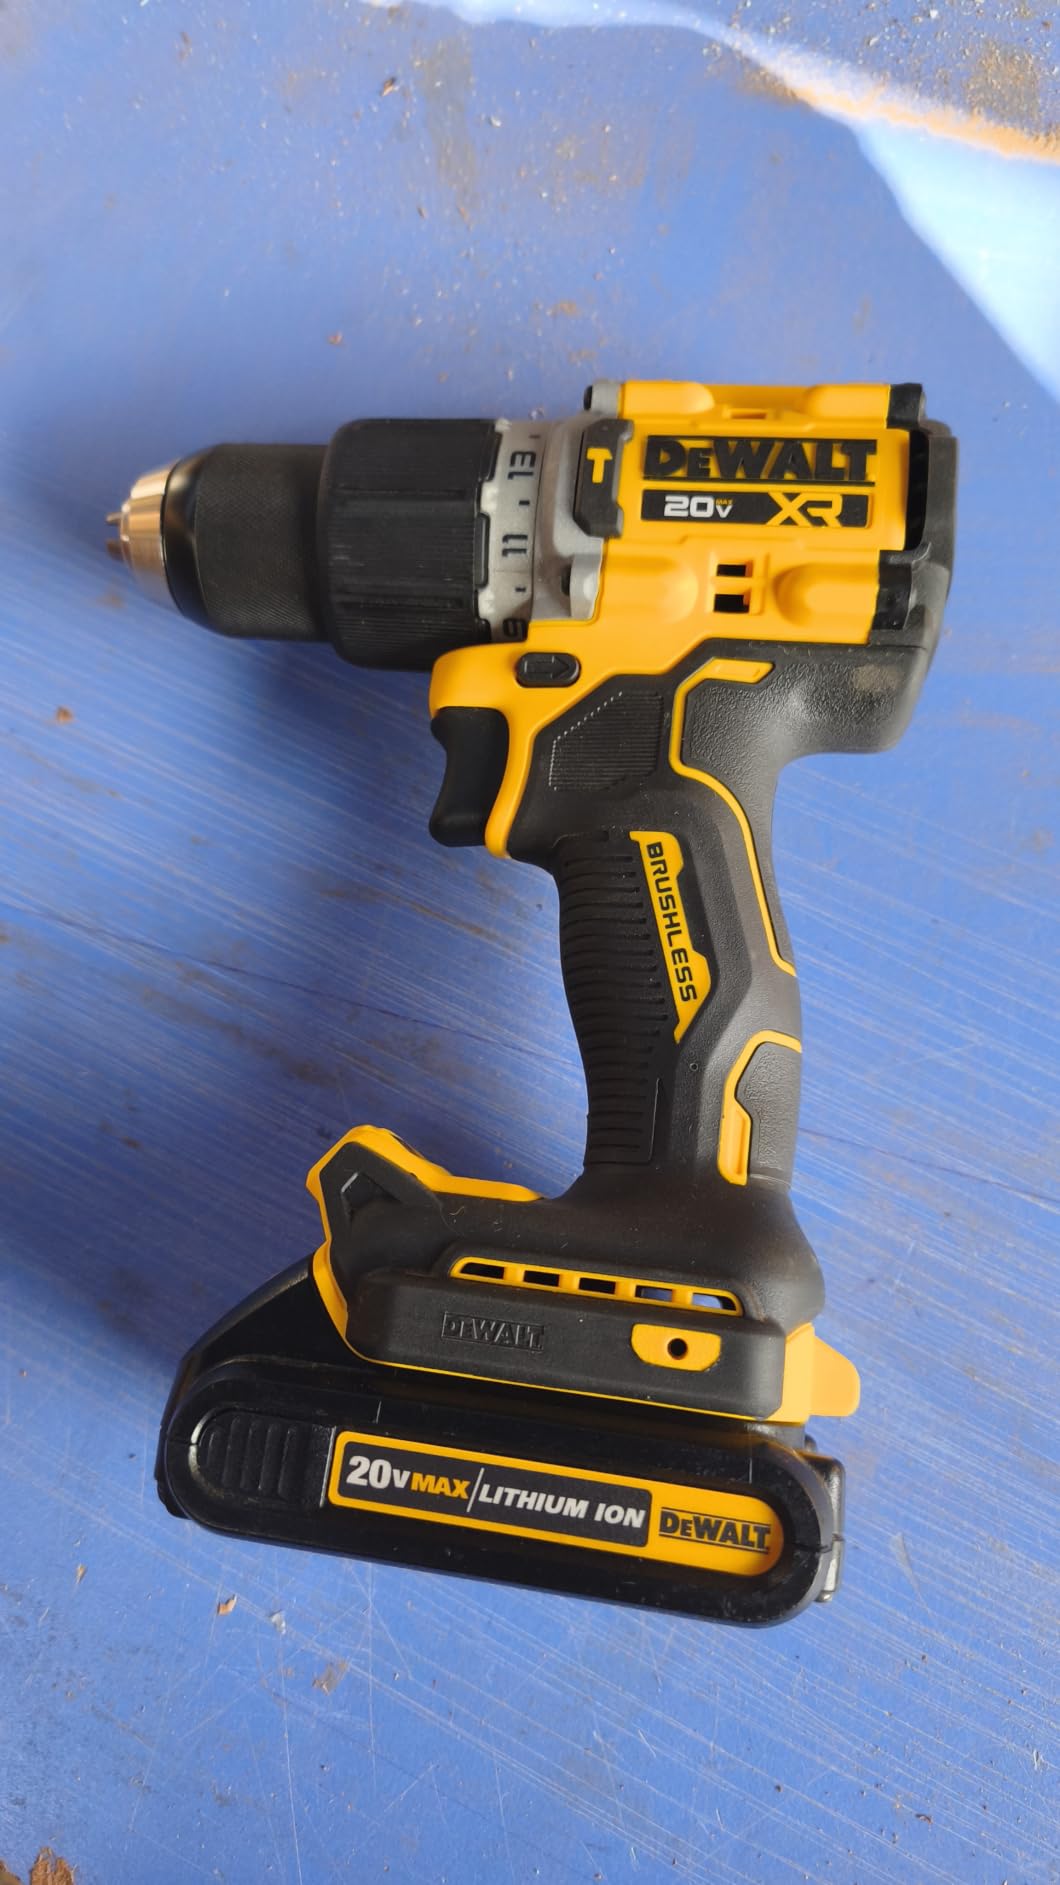
DeWalt’s XR line has long been a favorite among furniture makers who need repeatable, fine-grained control, and the 20V MAX XR Hammer Drill continues that reputation. The standout feature here is the 3-speed transmission, which gives you a genuinely useful middle gear between “delicate driving” and “full torque boring” — a range that the 2-speed drills on this list simply can’t match.
The 15-position clutch is also unusually precise, with enough separation between settings that you can dial in exact torque for driving screws flush into softwood without crushing the surrounding fibers, then jump straight to drill mode for through-holes. If you’re doing detailed joinery work alongside chisel and hand-tool operations, pair this drill with a quality set from our best chisel set for beginners guide and reference our breakdown of wood joinery tools explained.
Pros
- 3-speed gearbox gives an extra layer of control
- 15-position clutch is unusually precise
- LED work light with a genuinely useful spread
- Comfortable rubber overmold grip
Cons
- Slightly longer head than the Milwaukee and Bosch
- Battery sold separately in bare-tool configuration

DeWalt 20V MAX XR Hammer Drill — the best choice when fine-tuned control matters more than raw power.
Check Price on AmazonMakita 18V LXT Cordless Hammer Driver/Drill

Makita has built a loyal following among cabinetmakers largely because of how the LXT line feels in the hand during hours of continuous use, and this drill is no exception. At just 3.3 pounds bare, it’s one of the lightest full-power drills in this comparison, and the grip angle sits closer to a natural wrist position than the competition, which matters enormously when you’re pre-drilling dozens of pilot holes for face-frame assembly.
The two-speed gearbox isn’t the most feature-rich here, but Makita tuned the low-speed range specifically for controlled screw driving, and it shows: this drill was the easiest of the seven to sink screws flush without a single strip-out across our test boards. If ergonomics and low fatigue matter more to you than headline torque numbers, this is the pick.
We also noticed the trigger has an unusually smooth, progressive feel compared to the other drills tested, which makes it easier to start a screw slowly before ramping up speed — a small detail that pays off repeatedly over a full day of assembly work. Makita’s reputation for long-term reliability held up in our research as well, with owners frequently reporting years of daily use without major issues.
Pros
- Lightest full-size drill in the comparison
- Best-in-class grip comfort for extended sessions
- Smooth low-speed control for finish-grade screw driving
- Strong reputation for long-term durability
Cons
- Lower peak torque than Milwaukee and FLEX
- Only two speed settings

Makita 18V LXT Cordless Hammer Driver/Drill — the most comfortable option for marathon shop sessions.
Check Price on AmazonBosch 18V Brushless Hammer Drill/Driver

Bosch’s entry is the most compact drill in this lineup, with a notably short head length that made it our go-to pick when working inside partially assembled cabinet boxes or drawer interiors where a longer drill simply won’t fit. Despite the small footprint, the brushless motor delivers respectable torque, and the two-speed gearbox is well-suited to general woodworking tasks without feeling underpowered.
The compact design does come with a small trade-off: the battery sits lower and slightly forward compared to some competitors, which changes the balance point in ways some users love and others find takes an adjustment period. For shop layouts and workbench planning, this drill pairs well with a proper woodworking workbench, and if you’re building your own, check out our woodworking workbench plans PDF.
In practical testing, the short head length repeatedly proved its worth when reaching into partially assembled drawer boxes and behind face frames where a longer drill body simply couldn’t get a straight shot at the fastener. Bosch’s reputation for accessible service centers is also a real advantage if you ever need warranty support, something that’s not always guaranteed with newer or smaller brands entering the cordless space.
Pros
- Shortest head length for tight, confined spaces
- Brushless motor for longer runtime per charge
- Lightweight without feeling flimsy
- Solid warranty and service network
Cons
- Balance takes some adjustment for larger hands
- Mid-pack torque compared to Milwaukee and FLEX

Bosch 18V Brushless Hammer Drill/Driver — the top pick when a compact head and low weight matter most.
Check Price on AmazonSkil PWRCORE 20 Drill Driver Kit
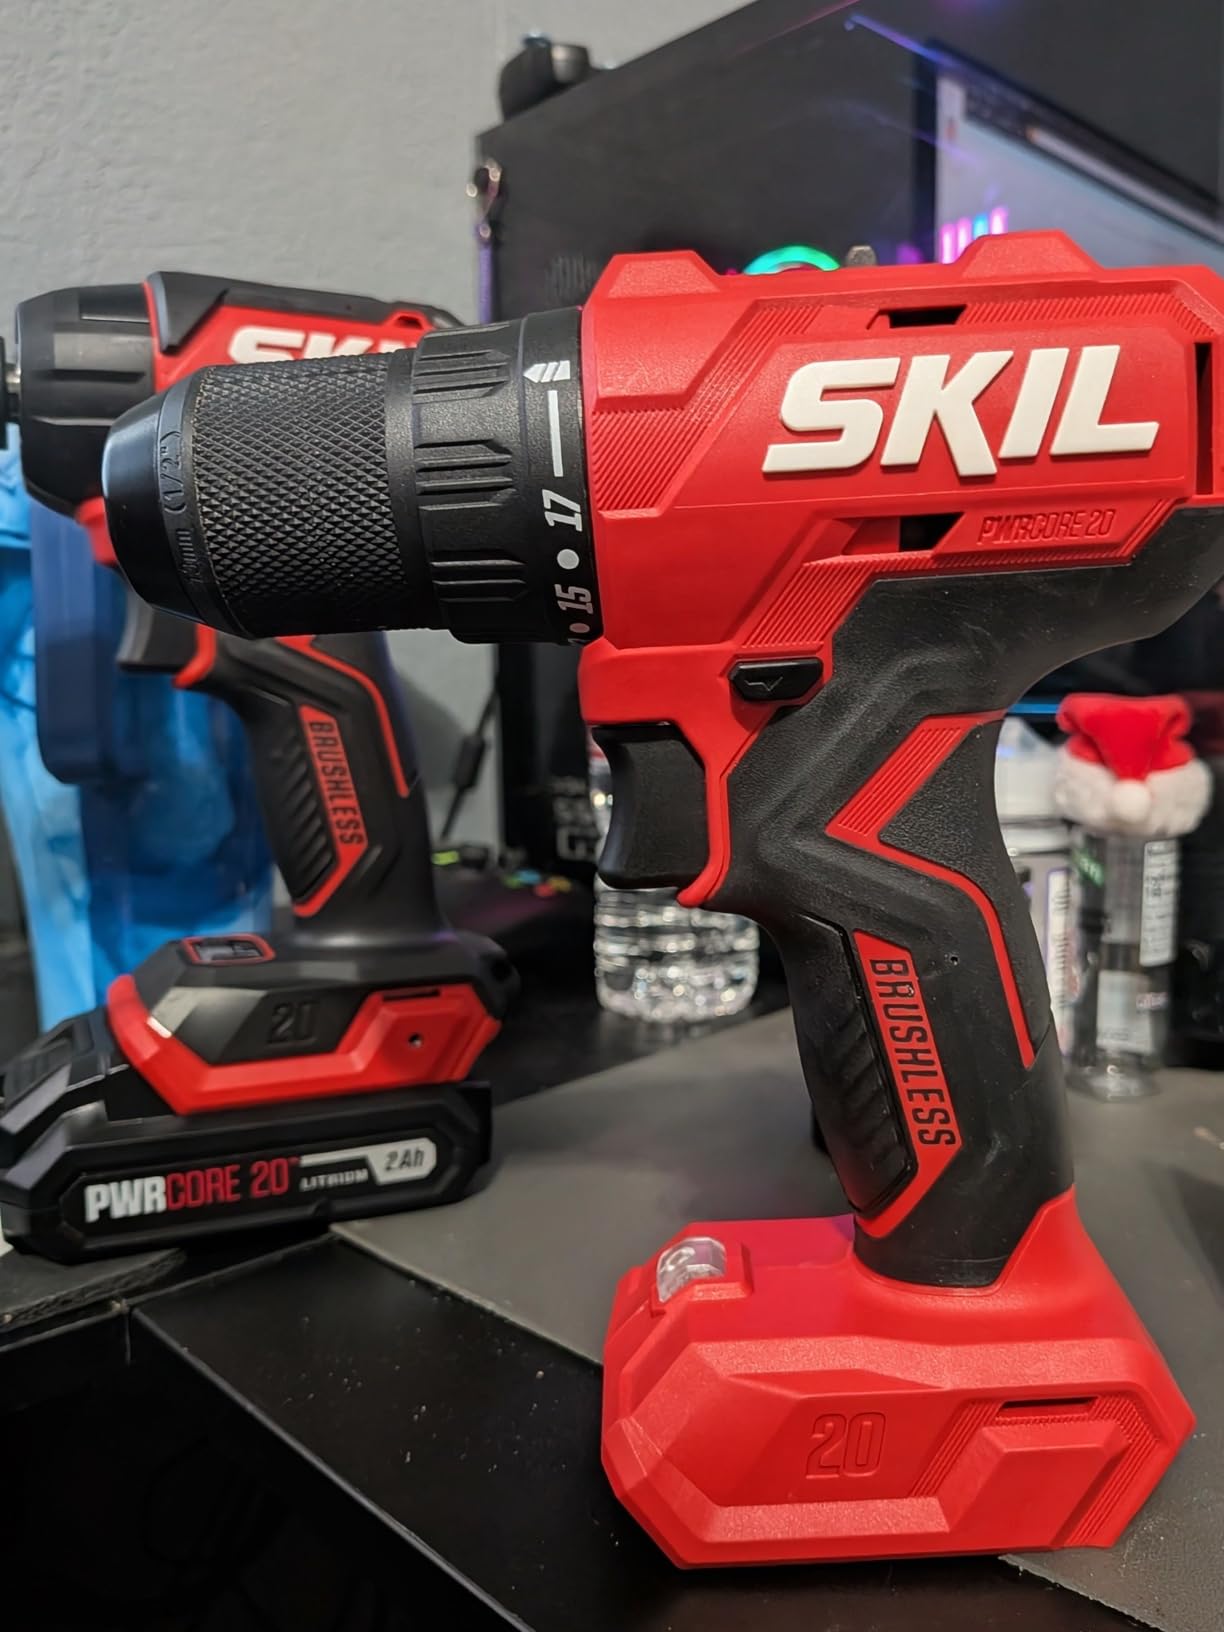
For hobbyists and weekend woodworkers building their first tool collection, the Skil PWRCORE 20 offers a genuinely surprising amount of capability for the price. It won’t match the premium brands on torque or chuck precision, but for building shop jigs, assembling shelving, or working on smaller furniture projects, it gets the job done reliably and the kit typically includes a charger and battery, keeping upfront costs low.
We found the clutch settings a bit coarser than the DeWalt or Milwaukee, meaning it’s easier to overdrive screws in softer woods if you’re not paying attention, but for the price point that’s an acceptable trade-off. This is a smart starting point if you’re still assembling your best woodworking tools collection on a budget.
We also appreciated that Skil didn’t cut corners on the basics: the keyless chuck tightens securely without slipping under moderate torque, and battery life on the included pack was enough to get through a full afternoon of shelf and jig building without needing a mid-session recharge. For a first drill or a secondary tool to keep at a second workstation, it punches well above its price point.
Pros
- Excellent price-to-performance ratio
- Kit includes charger and battery
- Light enough for beginners and occasional use
Cons
- Coarser clutch adjustments than premium brands
- Smaller battery ecosystem than Milwaukee, DeWalt, or Makita

Skil PWRCORE 20 Drill Driver Kit — the smartest budget pick for hobbyist woodworkers.
Check Price on AmazonRyobi 18V One+ Compact Cordless Drill

Ryobi’s One+ platform is enormous, which is the single biggest reason this drill lands on the list. If you already own other Ryobi tools — sanders, saws, shop vacs — adding this compact drill means one more battery that works across your whole collection. On raw performance it’s the least powerful drill here, with a 3/8-inch chuck instead of the 1/2-inch chuck found on every other entry, but for quick DIY tasks and lighter woodworking projects it’s fast, light, and easy to grab one-handed.
It shined in situations where speed mattered more than torque, like quickly assembling a jig or running a batch of small pilot holes for a random orbital sander storage rack. It’s not the drill we’d reach for on dense hardwood, but for general shop upkeep it’s hard to beat the value.
Where the Ryobi really earns its keep is as a second or third drill in a shop that already has a more powerful primary tool. Keeping a lightweight, quick-to-grab drill loaded with a driver bit while your main drill stays chucked with a boring bit saves the constant swapping that slows down assembly work, and at this price point it’s easy to justify owning two.
Pros
- Massive cross-compatible battery ecosystem
- Very light and easy to maneuver one-handed
- Affordable entry point for casual users
Cons
- 3/8-inch chuck limits large bit compatibility
- Lowest torque rating in this comparison

Ryobi 18V One+ Compact Cordless Drill — the fastest, most affordable way into cordless woodworking.
Check Price on AmazonFLEX 24V Brushless Cordless Hammer Drill
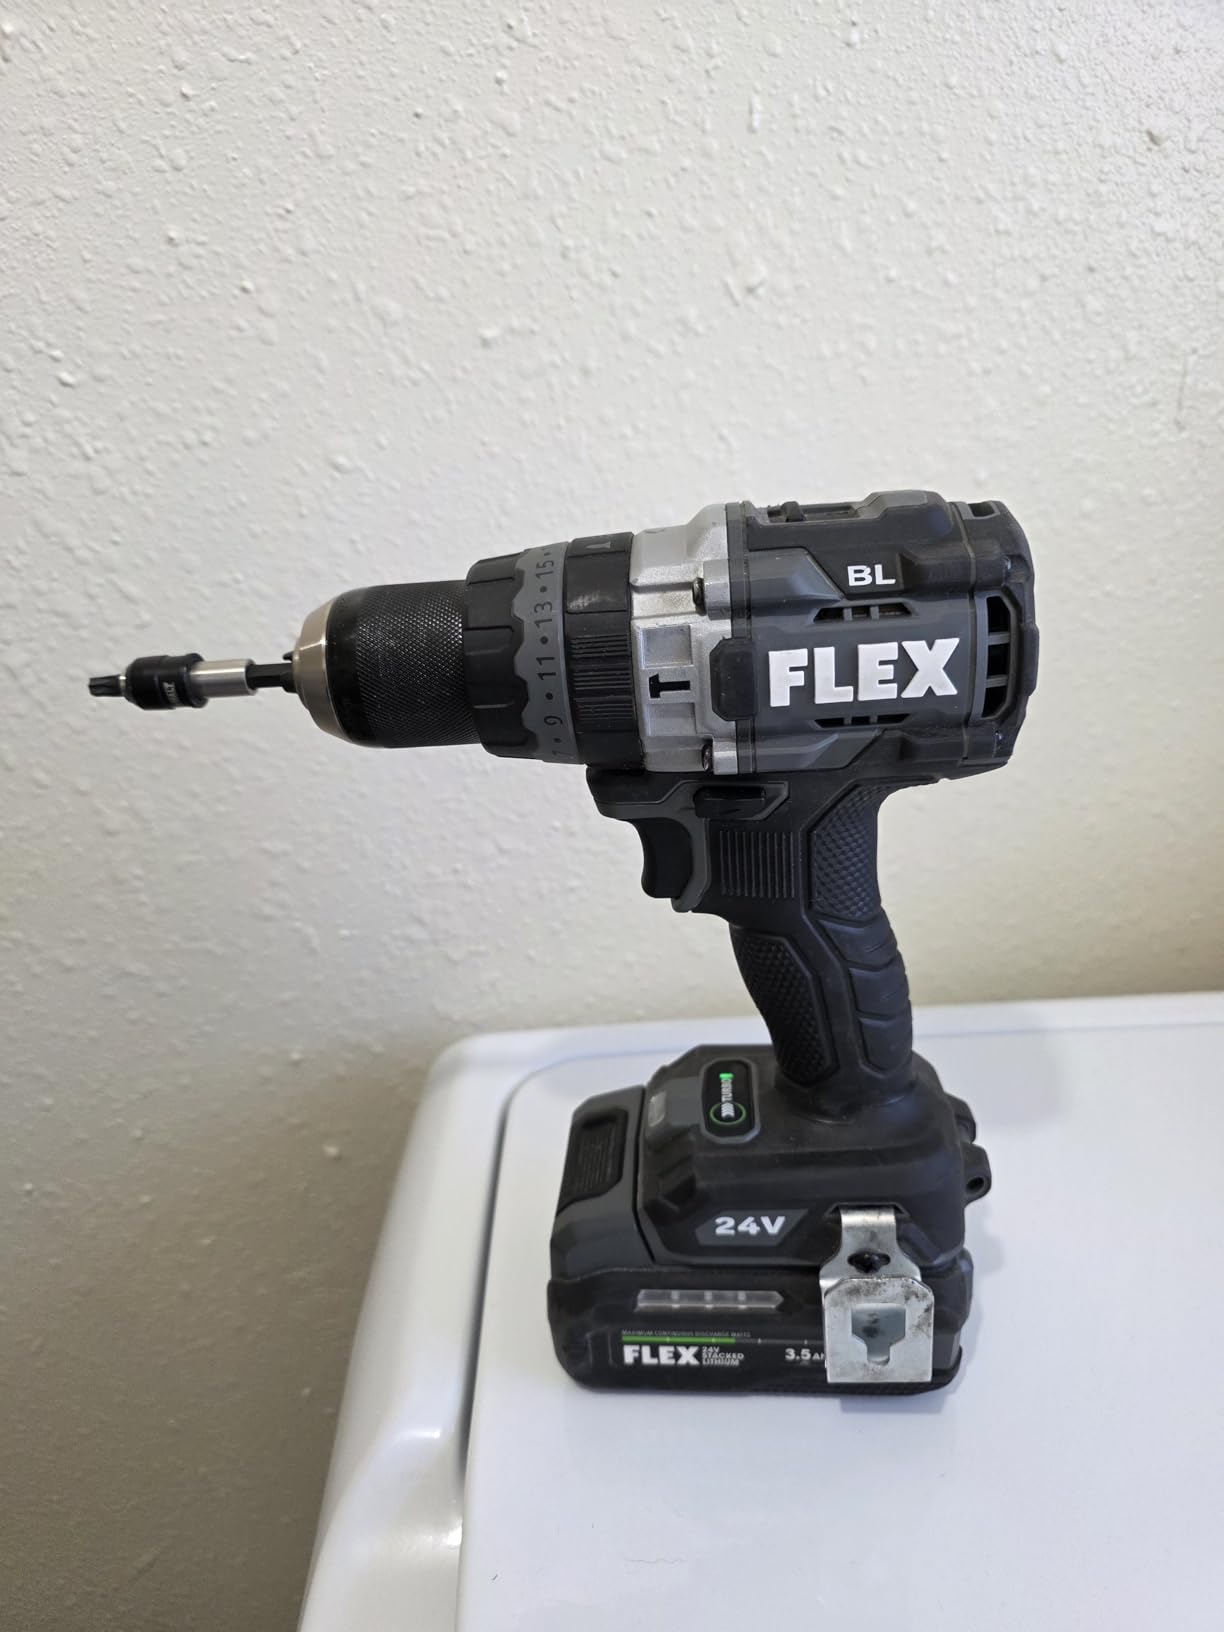
The FLEX 24V is the muscle of this lineup, delivering the highest torque figure in our comparison at 1,300 in-lbs. For woodworkers who regularly bore large-diameter holes through thick hardwood slabs, drive long structural screws into laminated beams, or build heavy workbenches and outdoor furniture, that extra headroom is genuinely useful rather than overkill.
The trade-off is size and weight — at nearly 4 pounds bare, it’s the heaviest drill here, and that adds up over a long session of overhead or awkward-angle work. But for shop builds involving big timber joinery or when paired with large forstner and self-feed bits, nothing else on this list matches its raw capability. This is also a strong companion for a serious miter saw for home shop setup where you’re processing dimensional lumber regularly.
During testing, the FLEX was the only drill that never showed any sign of bogging down when boring 1.5-inch holes through 8/4 hard maple stock, maintaining steady speed from start to finish. If your projects regularly push into that territory — thick slabs, structural outdoor builds, or large-format joinery — the added weight is a reasonable trade for the confidence that comes from a motor with real headroom to spare.
Pros
- Highest torque rating in this comparison
- Excellent for large-diameter boring in hardwood
- Robust build quality for demanding shop use
Cons
- Heaviest drill in the lineup
- Smaller battery ecosystem than the major brands

FLEX 24V Brushless Cordless Hammer Drill — the top choice when raw power is the priority.
Check Price on AmazonBuying Guide: What Actually Matters for Woodworking
Cordless drill marketing tends to lead with torque numbers because they’re easy to compare on a spec sheet, but torque alone doesn’t tell you whether a drill will serve you well at the bench. Woodworking tasks are usually low-torque, high-precision operations — driving a 1.25-inch screw into pine, boring a clean 3/8-inch dowel hole, or running a countersink bit at a controlled speed. The drills that perform best in this context balance power with fine control, rather than simply maximizing output.
Weight and balance matter just as much as raw specs. A drill that feels fine for five minutes in a hardware store can feel very different after two hours of repetitive pilot-hole drilling on a cabinet job. Pay attention to where the battery sits relative to the grip — a drill with the weight balanced closer to your hand will fatigue you less than one that’s front-heavy, even if the total weight is similar.
Finally, think about your existing tool ecosystem. If you already own batteries from a particular brand, staying within that platform saves money and reduces the number of chargers cluttering your bench. This is especially relevant if you’re building out a full kit — see our guide to hand tools vs. power tools for woodworking for how a drill fits into a balanced shop.
Noise and vibration are two more factors that rarely appear on spec sheets but noticeably affect the day-to-day experience of using a drill in a home shop, especially one located in a garage or basement near living space. Brushless motors tend to run quieter and smoother than older brushed designs, and a well-balanced gearbox transmits less vibration into the grip, which reduces hand fatigue over a long session of repetitive driving. If you do a lot of work in shared or noise-sensitive environments, it’s worth prioritizing this alongside torque and control when narrowing down your options.
It’s also worth considering how a drill will hold up over years of use rather than just its performance out of the box. Brands with long track records in the power tool space, strong parts availability, and accessible service networks tend to offer better long-term value even if the upfront price is slightly higher. A drill that needs to be replaced every two years because of failed bearings or a worn-out chuck ultimately costs more than a slightly pricier tool that lasts a decade of regular shop use.
Understanding Torque & Clutch Settings
Torque is measured in inch-pounds (in-lbs) and represents the rotational force the drill can apply. For woodworking, what matters more than the maximum figure is how finely the clutch lets you control torque at the low end. A drill with a wide range of clutch settings — DeWalt’s 15-position clutch is a good example — lets you dial in exactly enough force to seat a screw flush without crushing the wood fibers around it or stripping the screw head.
As a rule of thumb, softwoods like pine and cedar need lower clutch settings than hardwoods like maple or oak, and pilot-hole diameter should be matched to the screw you’re using to avoid unnecessary strain on the motor and clutch mechanism. If you’re new to selecting hardware and fasteners for joinery, our wood joinery tools explained article covers this in more depth.
A practical approach is to keep a small piece of scrap from your current project near the drill station and test your clutch setting on that scrap before driving into the actual workpiece. Two or three test screws will tell you exactly where the clutch should be set for a flush seat, and this habit alone will eliminate the majority of overdriven or stripped screws that plague woodworkers who rely on guessing or cranking the clutch to maximum. Over time you’ll build an intuitive sense for which setting works with which species and screw size, but even experienced woodworkers benefit from test-driving on scrap when switching materials or fastener types mid-project.
Chuck Types and Bit Compatibility
Most of the drills in this comparison use a 1/2-inch keyless chuck, which accepts a wider range of bit shank sizes, including large forstner and self-feed bits used for hardware installation and dowel joinery. The Ryobi’s 3/8-inch chuck is more limiting, but it’s also lighter and sufficient for the smaller bit sizes most DIY and light woodworking tasks require.
Chuck runout — the amount of wobble at the tip of a spinning bit — is often overlooked but critically important for clean, accurate holes. A chuck with noticeable runout will bore slightly oversized or off-center holes, which becomes obvious quickly when you’re using dowel joinery or installing hardware that requires tight tolerances. Higher-end chucks on the Milwaukee and DeWalt showed noticeably less runout than the budget options in our testing.
There’s also a practical distinction between single-sleeve and double-sleeve keyless chucks. Single-sleeve designs let you tighten and loosen with one hand, which is convenient when you’re holding a workpiece with the other hand at the bench. Double-sleeve designs require two hands but sometimes provide a firmer grip on the bit shank. For most woodworking tasks where you’re swapping between brad-point bits, countersinks, and driver bits frequently throughout an assembly session, a smooth single-sleeve chuck saves meaningful time. The Milwaukee and Makita both use single-sleeve designs that we found particularly easy to operate one-handed during testing, even with slightly dusty hands from sanding operations.
Battery Platforms & Ecosystem Lock-In
One of the most consequential decisions when buying a cordless drill isn’t really about the drill at all — it’s about which battery platform you’re buying into. Milwaukee’s M18, DeWalt’s 20V MAX, Makita’s 18V LXT, and Bosch’s 18V platforms are all mature ecosystems with dozens of compatible tools, from sanders to saws to shop vacuums, meaning a single battery pool can power your entire shop over time.
Ryobi’s 18V One+ platform, while generally lower-performing per tool, has one of the largest tool catalogs in the industry and is worth strong consideration for hobbyists building a shop on a budget. FLEX’s 24V platform is newer and more specialized, which is worth weighing if you’re planning to expand your tool collection within that brand over time.
Understanding Battery Capacity: Amp-Hours, Voltage & Runtime
Battery specifications can be confusing if you’re new to cordless tools, but understanding two numbers — voltage and amp-hours — tells you most of what you need to know. Voltage (18V, 20V, 24V) represents the electrical pressure the battery delivers, and in general, higher voltage means more potential power. However, modern motor design and electronics mean that the gap between 18V and 20V systems is much smaller than the numbers suggest — in practice, DeWalt’s “20V MAX” and Makita’s “18V LXT” batteries operate at very similar actual voltage levels under load.
Amp-hours (Ah) is the number that directly affects how long your drill runs before needing a recharge. A 2.0Ah battery holds roughly half the energy of a 4.0Ah battery, which means half the runtime — but it’s also lighter and charges faster. For woodworking tasks where you’re doing intermittent drilling between other operations (measuring, marking, cutting), a 2.0Ah pack may be perfectly adequate for a full session. If you’re doing continuous assembly work — driving fifty or sixty screws in a cabinet build without pauses — a 4.0Ah or 5.0Ah battery will save you from the frustration of mid-project recharge breaks.
Higher-capacity batteries also tend to deliver slightly more consistent power output as they drain. A small 2.0Ah pack may show noticeable power drop-off in the last twenty percent of its charge, while a larger pack maintains steadier output deeper into the discharge cycle. This matters most when you’re running large forstner bits or self-feed bits that draw heavy current — a partially depleted small battery may cause the motor to bog down where a larger pack of the same age would maintain speed.
One practical tip: most woodworkers are well served by owning two batteries of moderate capacity (say, two 4.0Ah packs) rather than a single high-capacity battery. While one is in use, the other sits on the charger, effectively giving you unlimited runtime without the added weight of a massive battery on the tool. This approach also provides a built-in backup if one battery unexpectedly fails or degrades over time.
Temperature also plays a role in battery performance that many woodworkers don’t consider. Lithium-ion batteries deliver their best performance between roughly 50°F and 100°F. If your shop is an unheated garage and you’re working through winter, you may notice reduced runtime and slower power delivery from a cold battery. Storing batteries inside the house and bringing them to the shop when you’re ready to work is a simple workaround that noticeably improves cold-weather performance. Likewise, a battery that’s been sitting in direct sunlight on a hot summer day may temporarily shut down its own protection circuit — let it cool to room temperature before use.
Brushless vs. Brushed Motors: What the Difference Really Means
If you’ve been shopping for cordless drills, you’ve noticed that “brushless” appears prominently in product descriptions and typically commands a price premium over brushed models. The difference is real and worth understanding, even though it may not matter equally for every woodworker.
In a traditional brushed motor, physical carbon brushes press against a spinning commutator to deliver electrical current to the motor’s windings. These brushes wear down over time, generate friction and heat, and eventually need replacement. A brushless motor uses electronic circuitry instead of brushes to control current flow, which eliminates the primary wear component and allows the motor to operate more efficiently.
What does that mean in practice? First, brushless motors typically deliver ten to twenty percent more runtime per charge than an equivalent brushed motor, because less energy is wasted as heat through brush friction. Over a full day of intermittent shop use, that efficiency difference can mean the difference between swapping batteries once or not at all. Second, brushless motors run cooler, which extends the overall lifespan of both the motor and the battery. Third, electronic control allows the motor to adjust its power output dynamically based on the load — when you’re driving a small screw into soft pine, the motor draws less current than when it’s boring a large forstner bit into hard maple, which again saves battery life and reduces unnecessary wear.
The downside is cost. Brushless drills typically run thirty to fifty percent more than their brushed equivalents from the same brand. For a woodworker who uses a drill occasionally for small projects, a brushed motor drill like the entry-level Ryobi or Skil options may be perfectly adequate and a smarter use of the budget. For someone drilling and driving regularly — building cabinets, assembling furniture, or running a small production shop — the brushless motor’s longer life, better efficiency, and cooler operation justify the premium within the first year of ownership.
All seven drills in this comparison use brushless motors, which is now standard at the mid-range and premium tiers of every major brand’s lineup. If you’re looking at drills outside this list and see a model that seems unusually cheap for its voltage class, check whether it uses a brushed motor — that’s often the primary reason for the price difference.
Drill/Driver vs. Hammer Drill vs. Impact Driver
All seven tools in this roundup are drill/drivers with an added hammer function, which is common in modern cordless lineups even though the hammer mode itself is rarely used for pure woodworking — it’s designed for drilling into masonry. What matters for wood is the standard rotary drilling and driving performance, which is what we focused our testing on.
It’s worth distinguishing these from impact drivers, which use a different internal mechanism (rotational impacts rather than continuous torque) and excel at driving long screws quickly but sacrifice the fine low-speed control that makes a drill/driver better suited to finish-sensitive woodworking tasks like face-frame assembly or hardware installation.
| Tool Type | Best Use Case | Woodworking Fit |
|---|---|---|
| Drill/Driver | Boring holes, controlled screw driving | Excellent — primary shop tool |
| Hammer Drill | Masonry, concrete anchors | Rarely needed for wood |
| Impact Driver | Fast, high-torque screw driving | Good secondary tool, less finesse |
A growing number of woodworkers own both a drill/driver and an impact driver, using the drill for precision boring and the impact for high-volume fastening where finish quality is less critical. This two-tool approach works well if you have the budget for it: keep the drill/driver chucked with a brad-point or forstner bit and the impact loaded with a driver bit, eliminating the constant swapping that slows down assembly work. If you can only buy one, the drill/driver is the more versatile choice for a woodshop because its adjustable clutch and smooth low-speed rotation give you control that an impact driver simply cannot match at low speeds.
Right-Angle Drilling & Specialty Drilling Situations
Standard cordless drills work beautifully for the majority of woodworking tasks, but certain projects create geometric challenges that a straight-body drill simply cannot reach. Drilling shelf-pin holes inside a tall cabinet carcass, boring pilot holes in the tight space between a face frame and a cabinet side, or driving screws in a drawer box where the drill body won’t fit between the sides — these are situations where right-angle drilling becomes necessary.
Several manufacturers sell right-angle drill attachments that chuck into your existing cordless drill and redirect the bit axis ninety degrees. These range from simple offset chucks that add about two inches of reach to more elaborate geared heads that maintain full torque at the redirected angle. For most woodworking applications, a basic right-angle attachment is sufficient — you’re typically driving small screws or drilling pilot holes in these tight spaces, not boring large-diameter holes that demand full motor torque.
Another specialty scenario is drilling in very thin stock, such as when you’re installing hardware on 1/4-inch plywood drawer bottoms or thin panel dividers. In these cases, a standard twist bit can grab and splinter the exit side of the material. Brad-point bits help here, but backing the workpiece with a scrap board is even more reliable — the scrap supports the wood fibers at the exit point and prevents blowout regardless of bit type.
Some woodworkers also encounter situations that require drilling at precise angles other than ninety degrees — think of drilling for pocket screws at an angle, creating angled dowel joints, or boring holes for hardware that requires a specific tilt. Angle guides and drilling jigs solve these problems, and many can be shop-made from scraps. The key principle is that the drill itself should always be held securely and the workpiece should be clamped — freehand angled drilling by eye almost never produces clean, repeatable results. If your projects frequently call for angled holes, investing in a pocket-hole jig (discussed in more detail below) or a dedicated angle-drilling jig will save significant time and improve consistency over hand-guided approaches.
Building Out Your Cordless Woodshop
A cordless drill rarely works alone in a real woodworking shop. Pairing it with the right cutting and shaping tools rounds out a capable small-shop setup — see our picks for a table saw for woodworking, the top wood router picks, and if you’re just getting your layout sorted, our guide to how to choose a table saw.
Don’t overlook workwear and shop comfort either. A well-fitted apron keeps fasteners, bits, and pencils within reach while you move between the bench and the drill press. Our comparisons of the best woodworking apron, the best leather woodworking apron, and reviews like the waxed canvas woodworking apron review, Rockler woodworking apron review, and Briteree woodworking apron review can help round out your shop kit.
And of course, none of this matters without a stable surface to work on. Check out our guides to the best woodworking workbench, a best portable woodworking workbench if space is tight, plus material considerations like the best wood for a woodworking bench and best plywood for a workbench top.
Cordless Drill vs. Corded Drill for Woodworking
For decades, corded drills were the default choice in every serious woodshop. They offered unlimited runtime, consistent power delivery, and no batteries to manage. Cordless models existed but were heavy, underpowered, and had short-lived nickel-cadmium batteries that faded fast. That era is definitively over. Modern lithium-ion cordless drills match or exceed the performance of most corded models for woodworking tasks, and the freedom of movement they provide has made them the preferred choice for the vast majority of woodworkers.
The advantages of going cordless in a woodshop are practical and immediate. You’re not tethered to an outlet, which matters more than you might think — moving a drill between the bench, the assembly table, and a cabinet sitting on the floor is seamless when there’s no cord to manage, route, or accidentally cut with a spinning bit. Cordless drills also tend to be lighter than their corded equivalents, since the motor housing doesn’t need to incorporate a cord strain relief or the heavier transformer components that some corded models carry.
That said, corded drills still hold a narrow advantage in one area: uninterrupted, full-power runtime for extended boring operations. If you regularly drill dozens of large-diameter holes in a single session — say, boring grommet holes in a batch of desktops or drilling multiple shelf-pin columns in tall bookcases — a corded drill eliminates any concern about battery depletion mid-batch. The practical reality, though, is that owning two batteries and rotating them on a charger achieves the same result for all but the most extreme continuous-use scenarios.
There’s also a cost consideration. A high-quality corded drill/driver can be purchased for considerably less than a comparable cordless model, since you’re not paying for batteries and a charger. If your shop has convenient outlet access at every workstation and you don’t plan to use the drill away from the bench, a corded model can free up budget for other tools. For everyone else — which is most woodworkers — the cordless drill’s convenience, improving performance, and expanding battery ecosystems make it the clear default choice for a modern shop.
One scenario where a corded drill still earns a permanent place in some shops is at the drill press station. A benchtop or floor drill press handles the precision boring tasks that benefit from a fixed, stable platform — consistent depth, perfectly perpendicular holes, and repeatable setups for production runs. In shops with a dedicated drill press, the cordless drill fills the portable, on-the-fly role while the corded press handles the precision work, and the two complement each other well without redundancy.
Care & Maintenance Tips
Cordless drills are relatively low-maintenance, but a few habits extend their lifespan significantly. Store batteries at partial charge rather than fully depleted or fully charged if the tool will sit unused for weeks, since lithium-ion cells degrade faster at the extremes. Keep the chuck free of sawdust by periodically opening it fully and blowing out debris with compressed air — sawdust buildup is a common cause of increased bit runout over time.
Avoid letting the motor run at stall (fully bogged down against resistance) for more than a second or two, as repeated stalling generates heat that shortens brush and bearing life on non-brushless models. Finally, keep a spare battery charged and ready; nothing kills shop momentum like a dead battery mid-project.
It’s also worth periodically checking the chuck jaws for wear, especially if you frequently swap between very small brad-point bits and large forstner or self-feed bits. Uneven jaw wear is one of the most common causes of a drill that used to hold bits securely suddenly allowing slippage under load. A quick visual inspection every few months, along with a light wipe-down of the chuck threads, keeps this from becoming a bigger problem. If you store your drill in a shared tool cabinet or job box, a simple foam-lined case protects the gearbox housing from impact damage during transport, which over time can throw off the internal gear alignment and introduce play that shows up as inconsistent torque delivery.
Beyond the drill itself, pay attention to your bits. Dull bits force the drill to work harder, which increases motor strain and battery consumption while producing rougher, less accurate holes. Sharpen or replace brad-point and twist bits when you notice increased resistance or tear-out around the hole edges. Forstner bits are more expensive to replace but can be resharpened with a flat file or a dedicated sharpening jig, extending their useful life considerably. Keeping a small container near your drill station with a few drops of light machine oil for occasional chuck lubrication is another simple habit that keeps the mechanism operating smoothly for years.
Common Mistakes Woodworkers Make With Cordless Drills
Even experienced woodworkers fall into a few avoidable habits that shorten tool life or lead to inconsistent results. The most common is using the wrong clutch setting for the material at hand — cranking the clutch to maximum “just to be safe” often results in stripped screw heads, crushed wood fibers around the screw, or over-driven fasteners that sit below the surface and require patching. Take the extra ten seconds to test your clutch setting on a scrap offcut before committing to your actual workpiece, especially when switching between species with different densities.
Another frequent mistake is skipping pilot holes altogether, particularly near the edges of boards or when working with brittle hardwoods like oak or hard maple that split easily under fastener pressure. A quick pilot hole sized appropriately to the screw’s shank diameter prevents splitting and reduces strain on both the fastener and the drill’s motor. Pairing this habit with a quality countersink bit also produces a cleaner, more professional-looking result on visible joinery.
Finally, many woodworkers underestimate how much battery capacity actually matters for all-day shop sessions. A single 2.0Ah battery might be fine for light tasks, but if you’re running a full day of cabinet assembly, investing in a higher-capacity battery (4.0Ah or above) or keeping a second battery charged on standby prevents the frustrating mid-project power loss that interrupts workflow and can even leave a partially driven screw sitting proud of the surface.
A fourth mistake worth mentioning is holding the drill at an angle when driving screws, which is surprisingly common when working in tight spaces or at awkward positions inside casework. Even a slight off-axis angle increases friction in the screw threads, makes the screw more likely to wander off its intended path, and can cause the bit cam out of the screw head. Taking an extra moment to reposition yourself or the workpiece so the drill is aligned with the screw axis saves time in the long run by eliminating the rework that comes from angled or misdriven fasteners. A fifth mistake is failing to match drill speed to bit diameter — running a large forstner bit at the same high speed you’d use for a small pilot hole generates excess heat, burns the wood, and dulls the bit prematurely. As a rough guide, larger bits need slower speeds, and harder woods need slower speeds than softwoods for any given bit diameter.
Essential Drill Bit Sets for Woodworking
A cordless drill is only as good as the bits you put in it, and having the right assortment of bits on hand for common woodworking tasks makes a bigger difference in your results than most beginners expect. There are four main categories of bits that every woodworker should own, and each serves a distinct purpose in the shop.
Brad-Point Bits
Brad-point bits are the workhorse of woodworking drilling. They have a sharp center point that positions the bit precisely and outer spurs that score the wood fibers before the cutting edges engage, producing clean, splinter-free holes with flat bottoms. They’re available in sizes from 1/8 inch up to about 3/8 inch in most sets, and they’re the go-to choice for drilling pilot holes, dowel holes, and shelf-pin holes. The best brad-point bits have fully ground spurs (rather than milled ones) that stay sharp longer and produce cleaner entry holes, especially in cross-grain situations where cheaper bits tend to tear out the surrounding fibers. A quality set in the 1/8 to 3/8 range covers the vast majority of woodworking drilling needs.
Forstner Bits
When you need flat-bottomed holes larger than a brad-point bit can handle — for hardware installation, concealed hinges, dowel joinery with larger dowels, or counterboring for bolt heads — forstner bits are the tool of choice. They produce exceptionally clean holes with smooth walls and flat bottoms, and they can bore overlapping holes for mortise work or elongated slots. Sizes commonly range from 1/4 inch to 2 inches, and a starter set covering 1/4, 3/8, 1/2, 5/8, 3/4, 7/8, 1, and 1-3/8 inches will handle most furniture and cabinet hardware requirements. Forstner bits do require more torque than brad-point bits, so running them on the low-speed setting of your drill is essential — and this is where the torque advantage of the Milwaukee or FLEX becomes noticeable in practice.
Twist Bits
Standard twist bits are the most common drill bits in existence and are useful for general-purpose drilling in wood, though they don’t produce as clean a hole as brad-point or forstner bits. They’re perfectly adequate for drilling clearance holes, rough holes in hidden areas, or tasks where hole quality is less critical. They’re also the right choice when you need to drill through metal hardware, screws, or metal components that sometimes come up in mixed-material projects. A standard set in fractional-inch sizes from 1/16 to 1/2 inch is inexpensive and covers general needs.
Countersink Bits
Countersink bits create a conical recess at the top of a hole that allows a flathead screw to sit flush with or slightly below the wood surface. In woodworking, countersinking is essential for any visible screw — face frames, hinge mounting, hardware installation, and anywhere a protruding screw head would interfere with the function or aesthetics of the piece. Combination countersink-and-counterbore bits drill the pilot hole and create the countersink in a single operation, which saves significant time during assembly. Adjustable-depth models let you control exactly how deep the screw sits, which is valuable when working with different screw sizes or wood thicknesses. A quality set of countersink bits in the #6, #8, and #10 screw sizes covers most woodworking fastening needs and is one of the most cost-effective shop investments you can make.
Spade Bits and Self-Feed Bits
For rougher, larger-diameter holes where finish quality is less important — running wires through a workbench, drilling for pipe or cable routing, or rough-cutting mortises — spade bits are an affordable option. They’re aggressive, fast-cutting, and inexpensive, but they produce rougher holes than forstner bits and can cause significant tear-out on the exit side of the workpiece. Self-feed bits are a step up, designed for boring large holes (typically 1 inch and above) through thick stock with less effort than spade bits. They’re commonly used in construction but find occasional use in woodworking shops for projects involving large-diameter hardware or structural components. Both types demand significant torque and should always be run at low speed on a drill with adequate power — this is squarely in the territory of the Milwaukee and FLEX models in our comparison.
Core Drilling Techniques Every Woodworker Should Know
Owning the right drill and the right bits is only half the equation — using the correct technique for each drilling scenario is what produces clean, accurate results consistently. Here are the core techniques that every woodworker should practice until they become second nature.
Marking and Center-Punching
Every hole starts with an accurate mark. Use a sharp pencil or marking knife to lay out your hole locations, then use an awl or center punch to create a small starting dimple at each mark. This dimple gives the brad-point or twist bit a physical seat to start in, preventing the bit from wandering when you first apply pressure. For repetitive hole patterns — shelf-pin holes, for example — a shop-made drilling template made from a piece of MDF or hardboard with holes precisely drilled at the drill press ensures perfect consistency across every hole without individual marking.
Starting Slow, Finishing Smooth
Begin drilling at low trigger pressure to let the bit establish its path, then gradually increase speed as the bit engages the wood. This is particularly important with larger bits like forstner bits, where a sudden high-speed start can cause the bit to grab and spin the workpiece if it’s not securely clamped. The smooth, progressive trigger on the Makita LXT made this technique easiest to execute in our testing, but any drill with good trigger modulation will work — it’s a technique issue more than a tool issue.
Clearing Chips and Managing Heat
When boring deep holes or using forstner bits, periodically back the bit out of the hole while it’s still spinning to clear accumulated chips from the flutes. Packed chips increase friction, generate heat, and can scorch the wood around the hole, especially in resinous softwoods like pine. This is also important for bit longevity — a bit that’s allowed to overheat repeatedly will lose its temper (hardness) and dull prematurely. For extended boring sessions, having a small brush or compressed air nearby to clear chips between holes keeps everything running cleanly.
Supporting the Exit Side
Whenever you’re drilling a through-hole, place a piece of scrap wood behind the workpiece to support the wood fibers at the exit point. Without this backing, the bit will tear out chunks of wood as it breaks through, leaving a ragged exit hole that’s unsightly on visible surfaces and can compromise the strength of joints near the hole. This is one of the simplest and most effective quality-improvement techniques in woodworking, and it costs nothing beyond a few seconds of setup time.
Drilling to a Consistent Depth
When you need multiple holes at the same depth — for shelf pins, dowels, or hardware mounting — relying on trigger control alone is unreliable. Use a piece of tape wrapped around the bit as a visual depth stop, or invest in an adjustable depth stop collar that clamps to the bit shaft and physically prevents the bit from going deeper than your target. For production work where consistent depth is critical, a drill press with a depth stop is the gold standard, but for shop tasks done with a cordless drill, a simple depth collar is inexpensive and highly effective.
How to Drill Perfectly Straight Holes Every Time
Drilling a hole that’s truly perpendicular to the wood surface is one of the most challenging basic tasks in woodworking, and it’s a skill that separates clean, professional-looking work from sloppy results. Freehand drilling at the bench introduces a small but consistent angular error — most people naturally tilt the drill slightly away from vertical, especially when pressing hard on the trigger. Over the length of a dowel or screw, even a degree or two of angular error becomes visible and can cause alignment problems in assembled joints.
The simplest solution for consistent perpendicularity is a drill guide block — a small rectangular block of hardwood or metal with a precisely bored hole that acts as a bearing surface for the drill bit. You hold the guide block on the wood surface and run the bit through it, and the block’s straight walls force the bit into a perpendicular path. Commercial versions are available inexpensively, or you can make one at your drill press in about five minutes from a scrap of hardwood. This is especially valuable for dowel joinery, where even slight angular misalignment between mating holes can prevent the joint from closing properly.
For situations where you need to drill into the edge of a board — such as when boring for dowels in a butt joint — a V-block or a simple shop-made cradle that holds the board steady on its edge makes perpendicular drilling much easier. The board’s edge is narrow, which makes it inherently unstable for freehand drilling; anything you can do to add stability pays off in accuracy. Clamping the board to the bench edge and drilling downward is another approach that leverages gravity to keep the drill aligned.
When drilling large-diameter holes with forstner bits, perpendicularity is even more critical because the flat bottom of the hole makes angular errors more visible and harder to disguise. Starting the forstner bit at low speed while holding the drill as vertically as possible, then pausing once the bit’s outer rim has scored a complete circle, lets you visually verify that the circle is concentric with your mark before committing to the full depth. If the scored ring is off-center, you can adjust your angle before the bit has removed enough material to make correction impossible — a technique that becomes second nature with a little practice.
For the highest precision on repetitive perpendicular holes, a portable drill guide with adjustable angles is worth the investment. These guides clamp to the workpiece and provide a rigid sleeve that the drill chuck or bit passes through, virtually eliminating angular error. They’re particularly valuable for shelf-pin hole drilling, where dozens of holes must be perfectly aligned for adjustable shelves to sit level across a cabinet.
Preventing Wood Splitting: Pilot Holes, Clearance Holes & Countersinking
Wood splitting when driving screws is one of the most frustrating and preventable problems in woodworking. It happens when the screw’s threads displace wood fibers outward, creating internal pressure that exceeds the wood’s ability to flex — the result is a visible crack, often along the grain, that can ruin a finished surface or weaken a structural joint. Understanding why splitting occurs and how to prevent it will save you from expensive mistakes and wasted material.
The single most effective prevention is drilling a pilot hole before driving any screw. A pilot hole removes material along the screw’s path, giving the threads somewhere to go rather than forcing them to displace surrounding wood. The correct pilot hole diameter depends on the screw size — as a general rule, the pilot hole should match the screw’s root diameter (the solid core, excluding threads), not the thread diameter. For softwoods like pine and cedar, you can use a slightly smaller pilot hole since these species compress more easily; for hardwoods like maple, oak, and cherry, match the pilot hole more closely to the root diameter to avoid splitting.
A clearance hole takes this principle one step further and is essential when driving screws into the top piece of a butt joint or any situation where the screw passes through one piece and threads into another. The clearance hole is drilled through the top piece at the screw’s full thread diameter, which means the screw slides freely through the top piece and only the bottom piece receives the threads. This pulls the two pieces tightly together without any wedging pressure in the top piece, which is the piece most likely to split. It’s an extra step that takes seconds but eliminates splitting almost entirely in face-frame assembly and similar operations.
Countersinking is the third element and serves both functional and aesthetic purposes. A countersink creates a conical recess at the hole’s entrance that allows a flathead screw to sit flush with or below the surface. More importantly from a splitting perspective, the countersink chamfers the hole’s entrance, which reduces the outward pressure the screw head applies to the surface fibers as it seats. Combination bits that drill the pilot, clearance hole, and countersink in a single pass are available and significantly speed up assembly work.
Location also matters — driving screws near the end of a board is where splitting risk is highest, regardless of pilot hole practices. The grain structure near a board’s end is more vulnerable because the fibers are short and unsupported. Adding a clearance hole and countersink becomes especially important in these locations. Some woodworkers also apply a tiny amount of wax or soap to screw threads before driving them into hardwood, which reduces friction and the force needed to seat the screw — less force means less outward pressure on the surrounding wood fibers. This trick works particularly well with brass screws, which are softer and more prone to snapping under high driving torque.
Drilling End Grain vs. Face Grain vs. Edge Grain
The direction you’re drilling relative to the wood’s grain has a significant impact on hole quality, bit selection, and technique. Understanding these differences and adjusting your approach accordingly produces cleaner, more accurate results across every type of joint and assembly.
Face Grain (Drilling Into the Flat Surface)
Drilling into face grain — the broad, flat surface of a board — is the most common scenario and generally the easiest to execute cleanly. Brad-point bits excel here, as their outer spurs sever the surface fibers before the cutting edges engage, producing a crisp hole entrance with minimal tear-out. For the cleanest possible entry, place a piece of masking tape over the hole location before marking and drilling — the tape holds the surface fibers in place and reduces the tendency of the grain to lift and tear. This trick is especially valuable in figured woods or species with interlocked grain, like cherry or walnut, where the grain direction at the surface may not be predictable.
End Grain (Drilling Into the End of a Board)
End grain presents unique challenges because you’re drilling directly into the exposed fiber ends, which are much harder than face or edge grain and resist cutting differently. Brad-point bits tend to wander more on end grain because the center point has difficulty gripping the open pore structure of the wood’s end. Starting the hole with a very light touch and low speed, or creating an awl mark slightly deeper than usual, helps the bit establish its position. For dowel holes in end grain — common in mortise-and-tenon joints, dowel-reinforced butt joints, and similar connections — accuracy is critical because angular errors in end-grain holes are immediately visible when the joint is assembled.
End-grain holes also tend to produce more heat because the bit is cutting across the full cross-section of every fiber rather than splitting fibers along their length. Slowing down your drilling speed and clearing chips frequently prevents the bit from overheating and scorching the wood, which is especially visible in lighter-colored species like maple and birch.
Edge Grain (Drilling Into the Narrow Edge of a Board)
Edge grain falls somewhere between face grain and end grain in terms of drilling difficulty. The narrow width of a board’s edge makes it inherently unstable for freehand drilling — the board wants to tip, and the drill wants to wander. Clamping the board securely, preferably with its edge facing upward so gravity assists in keeping the drill perpendicular, is essential. For dowel joinery in edges — a very common technique for edge-joining boards to make wider panels — a self-centering doweling jig dramatically improves accuracy and is one of the most cost-effective jig investments a beginner can make.
Drilling Different Wood Species: A Practical Guide
Not all wood drills the same way, and adjusting your technique, bit selection, and drill settings for the species you’re working with produces noticeably better results. Here’s a practical breakdown of how common woodworking species behave when drilled, and what adjustments will improve your outcomes.
Softwoods: Pine, Cedar, Fir, Spruce
Softwoods are forgiving to drill but prone to tear-out and crushing if you’re not careful. The relatively soft fibers compress easily under a screw head, which means overdriving is the primary risk — setting your clutch too high will bury screws below the surface and leave visible dimples around the screw head. Use a lower clutch setting than you think you need and work up from there. Brad-point bits produce clean holes in softwoods, but their outer spurs can occasionally split the grain if you drill too aggressively near a board’s edge. Moderate speed and steady pressure are the keys. Pine in particular can be resinous, which gums up bits over extended use — keeping a rag with a small amount of mineral spirits nearby to wipe sticky bits periodically keeps them cutting cleanly.
Medium-Hardwoods: Cherry, Walnut, Mahogany
These species are generally pleasant to drill — hard enough to hold a clean hole edge without crushing, but soft enough that bits don’t overheat quickly. Cherry and walnut both have beautiful grain that can be marred by tear-out around hole edges, so brad-point bits and masking tape on the entry surface are worthwhile precautions. These species split less readily than oak when screws are driven near edges, but pilot holes are still essential for any fastener within two inches of a board’s end. Mahogany’s open pores can cause brad-point bits to wander slightly on entry, so a firm awl mark is especially helpful with this species.
Hard-Hardwoods: Maple, Oak, Ash, Beech
Dense hardwoods demand more from your drill and your technique. Maple is notorious for burning when drilled at too high a speed with forstner bits — reducing speed and clearing chips frequently are essential to avoid dark scorch marks around hole edges. Oak, particularly red oak, has a pronounced open pore structure that causes brad-point bits to follow the grain rather than cut straight across it — a sharp bit and a deeper awl starting mark help counteract this tendency. Ash and beech are moderately dense and generally well-behaved, but both require properly sized pilot holes to avoid splitting when screws are driven. Across all these species, the higher torque of the Milwaukee or FLEX drills shows its value — maintaining steady bit speed through dense material without bogging down keeps the cut clean and reduces heat buildup. Budget drills like the Skil or Ryobi may struggle to maintain speed in the densest hardwoods, especially with larger bit sizes, which can result in burned holes and premature bit wear.
Exotic and Tropical Hardwoods
Species like ipe, teak, purpleheart, and wenge are extremely dense and often contain oils or silica that dull bits quickly. Drilling these woods requires sharp bits (consider dedicating a set of bits specifically for oily exotics), slower speeds, and patience. Carbide-tipped forstner bits outperform standard high-speed steel bits in these materials, and some woodworkers keep a separate set of brad-point bits specifically for oily species to avoid contaminating bits used for domestic hardwoods. Pilot holes are non-negotiable in exotic hardwoods — driving screws without them risks not just splitting but actually snapping the screw shaft under the torque required to force threads into such dense material.
Plywood, MDF, and Sheet Goods
Engineered sheet materials behave very differently from solid wood when drilled. Plywood’s cross-grain layers resist splitting but are prone to tear-out on the exit side, especially through the thin face veneer. Backing the workpiece with scrap and using a brad-point bit at moderate speed produces the cleanest results. MDF is abrasive and dulls bits quickly, so sharp bits and slower speeds extend their life. Particleboard is the most fragile of the three and will chip and crumble around hole edges if drilled too aggressively — low speed, light pressure, and very sharp bits are essential. For all sheet goods, the entry side typically looks cleaner than the exit side, so orient the workpiece with the show face up whenever possible.
Best Practices for Drilling Pocket Holes with a Cordless Drill
Pocket-hole joinery has become one of the most popular fastening methods in modern woodworking, particularly for face-frame assembly, cabinet construction, and quick furniture builds. The technique involves drilling an angled hole through one workpiece and into another, then driving a self-tapping pocket screw to pull the joint tight. While pocket-hole jigs handle the angle and alignment, the cordless drill you use significantly affects the speed, consistency, and quality of your pocket-hole joints.
When selecting a drill for pocket-hole work, the two most important characteristics are a reliable low-speed setting and consistent clutch behavior. Pocket screws are designed to be driven at moderate speed — too fast and the self-tapping threads can strip out in the receiving piece, especially in softer woods like pine. Too slow and the screw may not fully seat before the clutch disengages. The DeWalt 20V MAX XR’s three-speed gearbox was particularly well-suited to this work in our testing, offering a middle gear that paired perfectly with the speed and torque requirements of standard #7 and #8 pocket screws.
Drill selection matters too. Most pocket-hole jigs require a stepped drill bit with a specific pilot diameter and a larger clearance section, and these bits have a hex shank that fits into standard chucks. The stepped bit should be run at a moderate speed — high speed generates heat that can burn the pocket hole’s interior, especially in hardwood, which affects both the appearance and the glue surface if you’re reinforcing the joint with adhesive. After drilling the pocket, blow out or brush away the wood dust from inside the hole before driving the screw — packed dust can interfere with the screw’s self-tapping action and reduce the joint’s holding strength.
Clamping is another factor that affects pocket-hole quality. The jig itself should be clamped firmly to the workpiece, and the two mating pieces should be clamped together in their final alignment before driving the screw. Driving a pocket screw into an unclamped joint often results in the pieces shifting as the screw pulls them together, creating a misaligned joint that’s difficult to correct after the fact. A few seconds of setup with clamps saves minutes of frustration and rework.
For production runs — say, building a set of ten drawer boxes with identical pocket-hole joints — keeping a dedicated drill loaded with the pocket-bit and a second drill loaded with a driver bit speeds up the workflow considerably. This is one of the strongest arguments for owning two drills in a shop: the constant bit swapping between drilling and driving in a pocket-hole workflow adds up quickly when multiplied across dozens of joints. A budget-friendly second drill like the Ryobi One+ is perfect for this secondary role if your primary drill is a Milwaukee or DeWalt.
Hardware Installation: Drilling for Hinges, Drawer Slides & Knobs
Installing hardware is one of the most common reasons a woodworker reaches for a cordless drill, and the quality of your hardware installation has an outsized impact on how the finished project functions. Drawers that slide smoothly, doors that close squarely, and knobs that sit properly all depend on accurately drilled mounting holes.
European (Concealed) Hinges
European concealed hinges — the type found on most modern cabinet doors — require a large-diameter bore (typically 35mm, or about 1-3/8 inches) to a precise depth in the back of the door. This is a job for a forstner bit, and it demands consistent depth control across every cup hole. An adjustable-depth stop collar on the forstner bit is essential here, as even small variations in bore depth will cause some hinges to sit slightly recessed or proud, resulting in doors that don’t align properly on the cabinet face. The Milwaukee and DeWalt drills both handled these 35mm bores cleanly in our testing, maintaining steady speed through the cross-grain bore without bogging down or producing burned edges.
Drawer Slides
Most modern drawer slides mount with a series of small screws into the cabinet sides and the drawer box exterior. The challenge isn’t the drilling — small pilot holes are straightforward — but the alignment. Drawer slides must be mounted perfectly level and at consistent positions on both sides of the cabinet, or the drawer will bind, rack, or fail to close fully. Using a spacer block or a dedicated drawer-slide installation jig ensures consistent positioning, and driving the mounting screws with the clutch set to a moderate level prevents overdriving through the thin material that most drawer-slide mounting holes are designed for. The precision of the DeWalt’s 15-position clutch was noticeable here, allowing us to set an exact torque that seated screws firmly without crushing the slide’s mounting ears.
Knobs and Pulls
Cabinet knobs and pulls require through-holes in the door or drawer face, and the hole must be precisely located for the hardware to look centered and professional. For single knobs, a simple measuring approach (finding the center of the door or drawer face) works well, but for pulls with two mounting holes, a drilling template or jig is almost essential for consistent placement across multiple doors and drawers. Drilling the hole from the show face with a brad-point bit produces the cleanest entry, and backing the workpiece with scrap prevents tear-out on the back side where the bolt passes through. Using a slightly oversized clearance hole (typically 3/16 inch for a #8-32 machine screw, which is the standard for most cabinet hardware) allows some adjustment room during final positioning.
Soft-Close and Specialty Hardware
Soft-close mechanisms, lid stays, and specialty hinges (such as bi-fold or piano hinges) each come with their own mounting requirements, and the manufacturer’s instructions should be followed precisely for hole locations and screw sizes. The common thread across all hardware installation is that accuracy in drilling determines whether the hardware functions as designed — a misaligned soft-close damper won’t engage properly, and a piano hinge with unevenly spaced screws will bind instead of folding smoothly. Taking the time to mark, measure, and drill carefully pays off in hardware that operates exactly as it should.
How We Tested These Drills
Our evaluation process focused on tasks that mirror real woodworking projects rather than generic power tool benchmarks. Each drill drove a batch of #8 wood screws into both pine and hard maple test boards to assess clutch precision and the likelihood of stripping or over-driving at various settings. We also ran each drill through repeated pocket-hole drilling using a standard jig to test speed consistency and heat buildup over an extended session.
For boring performance, we used matched forstner bits across a range of diameters to test how well each drill maintained speed and torque under load without bogging down, since a drill that stalls repeatedly on larger bits becomes frustrating fast and can burn out its motor prematurely. Ergonomics were assessed through extended handling sessions simulating a multi-hour cabinet build, with particular attention paid to grip fatigue, balance point, and how each drill felt when working at awkward angles inside partially assembled casework.
Finally, we compared published torque, speed, and weight specifications against manufacturer documentation and cross-referenced user-reported reliability trends to round out our long-term durability assessment. No single test perfectly predicts how a tool will perform in your specific shop, but combining hands-on testing with real-world usage patterns gives a much more reliable picture than spec sheets alone.
Matching a Drill to Your Typical Projects
Not every woodworker needs the same drill, and thinking honestly about the projects you build most often will steer you toward the right pick faster than chasing the highest torque number on the shelf. If your work leans toward fine furniture, jewelry boxes, or detailed joinery where precision and a light touch matter more than raw power, the Makita LXT or DeWalt XR will likely serve you better than a heavy-duty option like the FLEX.
If you regularly build outdoor structures, workbenches, or anything involving thick dimensional lumber and long structural screws, the extra torque headroom on the Milwaukee or FLEX pays off in reduced strain on the motor and fewer stalled attempts on tough material. And if you’re just starting out and still figuring out which projects you enjoy most, a mid-range option like the Bosch or a budget-friendly choice like the Skil gives you room to grow without a large upfront investment, while still handling the vast majority of beginner and intermediate woodworking tasks with ease.
Whatever you choose, remember that a drill is a long-term shop investment. Buying into a battery platform with a wide tool selection — as covered in our best woodworking tools roundup — often matters more over a five-year horizon than squeezing out an extra 100 in-lbs of torque on day one.
Cordless Drill Safety Tips for the Woodshop
Cordless drills are among the safest power tools in a woodshop, but they’re not without risk. Most drill-related injuries come from predictable and preventable causes, and developing good habits from the start keeps you safe without slowing you down.
The most common drill-related injury in a woodshop is a spinning workpiece. When a bit grabs — particularly a large forstner bit or a spade bit — it can rotate the workpiece with surprising force if it’s not clamped. A board spinning at drill speed can bruise fingers, break nails, or worse. Always clamp your workpiece before drilling, even if you think you can hold it steady with one hand. This is non-negotiable when using forstner bits, spade bits, or any bit larger than about 3/8 inch. Quick-release clamps make this fast enough that there’s no excuse for skipping it.
Eye protection is the second essential habit. Drilling produces chips and dust that fly directly back toward your face, and a wood chip in the eye is not just painful — it can cause lasting damage. Safety glasses should be on your face before the drill starts spinning, every time. This is especially important when drilling overhead or at awkward angles where the chip trajectory points toward your face rather than away from it.
Dust inhalation is a longer-term risk that many woodworkers underestimate. Drilling generates fine dust that stays airborne longer than the coarser chips produced by saws and routers. If your shop doesn’t have a dust collection system, wearing a simple N95 respirator during extended drilling sessions — particularly with MDF, plywood, or exotic hardwoods that contain known irritants — is a worthwhile precaution. Positioning a shop vacuum near the drilling area with the nozzle pointed at the workpiece captures a significant portion of the dust at the source.
Finally, pay attention to what’s behind and beneath your workpiece. Drilling into a workpiece that’s resting on a metal table surface can damage both the bit and the table when the bit breaks through. Drilling into a workpiece that’s leaning against your workbench’s vise can send the bit into the vise jaw. And drilling into a piece that’s resting on your benchtop without protection will mar the bench surface. A simple sacrificial board underneath your workpiece solves all of these problems simultaneously.
Sleeves, loose clothing, and jewelry are additional hazards around spinning tools. A long sleeve or a dangling necklace can catch on a spinning chuck or bit with enough force to pull your hand into the workpiece. Roll up sleeves, remove dangling items, and tie back long hair before operating any spinning tool, including a handheld drill. These precautions take seconds and prevent injuries that can sideline you from the shop for weeks.
Best Cordless Drill Accessories for Woodworking
Beyond bits, several accessories extend the usefulness of a cordless drill in the woodshop and improve the quality of your results. Here are the accessories worth adding to your drill station.
Drill Bit Indexes and Storage
A well-organized bit collection saves time and prevents the frustration of searching for the right size mid-project. Metal or plastic bit indexes with labeled slots for each size keep brad-point, twist, and forstner bits organized and protected from damage. Bits that rattle loose in a drawer or toolbox dull faster and are easy to misplace. Mounting a bit index on the wall near your drill station, within arm’s reach of where you typically work, keeps the most commonly used sizes instantly accessible.
Depth Stop Collars
Adjustable depth stop collars clamp onto any round-shank bit and physically prevent it from drilling deeper than your target depth. They’re inexpensive, reusable, and essential for any work requiring consistent depth across multiple holes — shelf-pin holes, dowel holes, and hardware-mounting bores all benefit from a depth stop. A set of collars in common sizes costs only a few dollars and eliminates the unreliable “tape on the bit” approach to depth control.
Magnetic Bit Holders and Extensions
A magnetic bit holder extends the reach of your driver bit and holds the screw magnetically, freeing your other hand to position the workpiece or hold a clamp. For driving screws in tight spaces — inside cabinet carcasses, between face-frame stiles, or in the back corners of drawer boxes — a six-inch magnetic extension is often the difference between reaching the fastener comfortably and contorting into an awkward position that compromises your control. Quick-change hex-shank holders also speed up bit swaps significantly compared to chucking and unchucking round-shank driver bits.
Countersink and Plug Cutter Sets
If you do any work where screw heads will be visible, countersinking and plugging the holes produces a much cleaner result than leaving exposed fastener heads. A countersink bit creates the recess, the screw is driven flush, and then a wooden plug (cut with a plug cutter from matching stock) is glued into the recess and sanded flush, making the screw completely invisible. This technique is standard in fine furniture work and produces a result that looks significantly more professional than filled screw holes or exposed heads.
Right-Angle Attachments
As discussed in the right-angle drilling section, these simple chucks redirect the bit axis ninety degrees, allowing you to drill and drive in spaces where the drill body won’t fit. They’re particularly valuable for cabinetmakers who frequently need to drive screws in tight cabinet interiors or drill shelf-pin holes in partially assembled casework.
Dust Collection Attachments
Several manufacturers offer drill-mounted dust collection shrouds that connect to a shop vacuum hose and capture chips and dust at the point of drilling. These are most valuable when working overhead, when drilling MDF or other materials that produce irritating fine dust, or when working in a shared living space where dust control is a priority. They’re not essential for every woodworker, but they’re a meaningful quality-of-life improvement for anyone who drills frequently and cares about air quality in their shop.
Cordless Drill Noise Levels: What to Expect in a Home Shop
Noise is a practical concern for many home woodworkers, especially those who share their shop space with a garage, basement, or outbuilding adjacent to living areas. While cordless drills are significantly quieter than table saws, planers, or routers, they’re not silent — and extended drilling sessions can be noticeable to family members or neighbors in nearby rooms.
Most cordless drills produce between 75 and 90 decibels under load, depending on the speed setting, the material being drilled, and the drill’s motor design. Brushless motors tend to run several decibels quieter than brushed motors of equivalent power, which is one of the less-discussed advantages of the brushless designs that now dominate the mid-range and premium tiers. In our testing, the Makita LXT and Bosch 18V were subjectively the quietest drills, with a smooth, low-pitched motor sound that was noticeably less fatiguing over extended use than the higher-pitched whine produced by some competitors.
The type of bit you’re using also affects noise significantly. Small brad-point bits running at high speed produce a relatively quiet whir, while large forstner bits under load produce a deeper, louder growl that carries through walls more effectively. Impact drivers, if you own one as a secondary tool, are dramatically louder than drill/drivers — the internal impacting mechanism produces a rapid, high-pitched hammering sound that can exceed 100 decibels and is one of the loudest tools in a typical home shop. If noise is a concern, reserve impact driver use for outdoor work or times when the shop’s noise won’t disturb others.
Simple mitigation strategies include working during reasonable hours, keeping shop doors closed to contain sound, and scheduling your loudest drilling tasks — large forstner boring, production assembly runs — during times when noise won’t be an issue. A rubber mat under your workbench also helps absorb vibration that transmits through the bench and into the floor structure, which can carry sound to rooms below or adjacent to the shop. For woodworkers in apartments or shared spaces, choosing a drill known for quiet operation — like the Makita or Bosch in our lineup — and keeping drilling tasks to daytime hours maintains good relationships with neighbors while still allowing productive shop time.
Upgrading Your Drill: When It’s Time and What to Look For
If you’ve been using the same cordless drill for several years and are wondering whether an upgrade is worthwhile, there are a few clear signs that a newer model will meaningfully improve your shop experience. The most obvious indicator is battery life — if your current batteries no longer hold a charge through a typical project session, or if you find yourself constantly rotating between a dwindling collection of aging packs, newer lithium-ion cells will feel like a revelation. Battery technology has improved steadily, and even a drill from five years ago paired with modern batteries will see a significant runtime improvement.
Another sign it’s time to upgrade is chuck quality. If your current drill’s chuck has developed noticeable runout — you can see the bit wobbling as it spins — the holes it produces will be slightly oversized or off-center. This is particularly problematic for dowel joinery and hardware installation, where precision matters. Chuck wear is gradual, so many woodworkers don’t notice the decline until they try a new drill and realize how much cleaner their holes can be. The all-metal chucks on the Milwaukee and DeWalt in our comparison showed near-zero runout even after extensive testing, and that precision difference is immediately noticeable in the shop.
Ergonomics are another upgrade-worthy consideration. If your current drill causes hand or wrist fatigue during extended sessions, switching to a lighter, better-balanced model like the Makita LXT or Bosch 18V can make a surprising difference in your comfort and productivity. This is especially relevant for woodworkers who have developed any hand or wrist issues over time — a lighter drill with a more natural grip angle reduces strain on the joints and tendons in ways that accumulate over hours and years of use.
When evaluating potential upgrades, focus on the features that matter most for your specific workflow rather than comparing every spec on the box. If you mostly drive screws and drill small pilot holes, the clutch quality and trigger feel matter more than peak torque. If you regularly bore large holes, the motor’s ability to maintain speed under load is the critical metric. And if you’re expanding your tool collection, the battery platform’s breadth and depth may be the most important factor — switching brands means replacing all your batteries and chargers, which is a significant cost that should be weighed against the performance advantages of the new drill.
Organizing & Storing Your Cordless Drill and Accessories
A well-organized drill station saves time on every project and extends the life of your tools and accessories. The goal is to have your drill, batteries, charger, and most-used bits within arm’s reach of your primary work area, with everything returning to a designated spot after each use.
Wall-mounted drill holders are the most space-efficient storage solution for most shops. Simple hook-style holders that mount to a French cleat system or directly to the wall keep the drill off the bench surface and out of the way when it’s not in use. If you prefer benchtop storage, a dedicated drill stand or cradle keeps the drill upright and ready to grab, with the battery docked and the charger nearby. Several aftermarket options exist, or you can build a simple holder from scrap plywood in fifteen minutes.
Bit storage deserves its own organized space near the drill station. As mentioned in the accessories section, indexed bit cases with labeled slots prevent the common problem of digging through a mixed pile of bits to find the right size. Mounting these on the wall at eye level next to your drill means you can grab the right bit in seconds without interrupting your workflow. For specialty bits — forstner bits, countersink bits, spade bits — individual labeled cases or a dedicated drawer with foam inserts keeps them protected and easy to find.
Battery management is the third piece of the organization puzzle. Having a dedicated charging station — a shelf or bracket near an outlet where batteries live when not in use — prevents the common problem of misplacing batteries or finding a dead one when you need it. Labeling batteries with their purchase date helps you track age and plan for replacement before capacity degradation affects your work. Rotating through your batteries evenly, rather than always reaching for the same one, also helps ensure they age at a similar rate and fail around the same time, so you can plan replacements rather than being caught off guard.
For woodworkers who share their shop space or work in a multi-use garage, a portable drill kit — a toolbox or bag containing the drill, two batteries, a charger, and a basic bit assortment — lets you grab everything you need in one trip and keeps the tools together when they’re returned to storage. This approach also makes it easy to bring your drill to a friend’s shop, a job site, or an outdoor project without forgetting critical accessories.
Warranty, Service Networks & Long-Term Brand Comparison
When you’re investing in a cordless drill that you expect to use for years, the manufacturer’s warranty and service infrastructure matter as much as the tool’s out-of-box performance. A great drill with no accessible service support when something goes wrong ends up costing more in replacement parts and downtime than a slightly less impressive tool backed by a strong support network.
Among the brands in this comparison, Milwaukee and DeWalt offer the most robust service networks in North America. Both brands have extensive authorized service center coverage, fast turnaround on warranty repairs, and well-stocked parts departments that can supply replacement chucks, gears, and electronics if needed. Milwaukee’s warranty covers five years on most M18 tools, while DeWalt’s standard warranty is three years with an optional extended service agreement. Both brands also have strong online communities where troubleshooting advice and repair tutorials are readily available, which is valuable for minor issues you can resolve yourself.
Makita’s service network is strong in urban areas but can be more limited in rural regions, something worth checking before purchasing if you live outside a major metropolitan area. Makita’s standard three-year warranty is competitive, and the brand has a well-earned reputation for building tools that rarely need warranty service in the first place — long-term reliability is one of Makita’s core selling points, and owner reports consistently confirm it.
Bosch has an extensive global service network and maintains dedicated service centers in most North American markets. Their warranty coverage is comparable to DeWalt’s, and Bosch’s service department has a reputation for straightforward, no-hassle warranty processing. For woodworkers who value the peace of mind that comes from knowing service is easily accessible if needed, Bosch is a reassuring choice.
Skil and Ryobi occupy the value end of the market, and their service networks reflect that positioning. Ryobi tools are serviced through Home Depot’s tool rental and service desks in many locations, which provides convenient access but can involve longer turnaround times than dedicated brand service centers. Skil’s service infrastructure is more limited, though the brand’s lower price points mean that some owners treat the tools as semi-disposable and simply replace rather than repair if issues arise. FLEX is the newest brand in this comparison and is still building out its service network, which is worth considering if long-term support is a priority for you.
Beyond warranty coverage, consider the long-term availability of batteries and accessories for the platform you choose. Milwaukee, DeWalt, and Makita have committed publicly to maintaining backward compatibility with their battery platforms for the foreseeable future, meaning a battery you buy today will work with new tools released years from now. This long-term commitment makes investing in these platforms safer than buying into a newer or smaller brand that may discontinue or modify its battery format over time.
Frequently Asked Questions
What torque rating do I actually need for woodworking?
For most furniture and cabinetry work, 500–800 in-lbs is plenty. Higher torque ratings like the FLEX’s 1,300 in-lbs mainly benefit large-diameter boring in dense hardwood or heavy timber framing rather than everyday joinery and screw driving.
Do I need a hammer drill function for woodworking?
No. Hammer functions are designed for masonry and concrete. All the drills in this list include one because it’s a common feature in modern lineups, but you’ll rarely, if ever, use it on wood.
Is a brushless motor worth the extra cost?
Generally yes. Brushless motors run cooler, last longer, and deliver more efficient power transfer from the battery, which translates to longer runtime per charge and less long-term wear.
What chuck size should I look for?
A 1/2-inch chuck offers the widest bit compatibility, including large forstner and self-feed bits. A 3/8-inch chuck, like the one on the Ryobi, is lighter but limits you to smaller bit shanks.
Should I buy a drill/driver or an impact driver for woodworking?
A drill/driver is the better primary tool for woodworking because of its finer low-speed control. Many woodworkers eventually add an impact driver as a secondary tool for fast, high-volume screw driving where finesse matters less.
How much does battery platform matter?
Quite a bit if you plan to build out a full cordless tool collection. Staying within one brand’s battery platform (Milwaukee M18, DeWalt 20V MAX, Makita 18V LXT, etc.) lets you share batteries and chargers across sanders, saws, and other tools.
Can a budget drill like the Skil handle real woodworking projects?
Yes, for most hobbyist-level furniture and shop projects. It has less refined clutch control than premium options, so extra care is needed on delicate softwoods to avoid overdriving screws.
What’s the ideal weight for a woodworking drill?
Most woodworkers find 3.0–3.5 pounds bare weight to be a comfortable sweet spot for extended use. Heavier drills like the FLEX offer more power but can fatigue the wrist faster during long sessions.
Do I need a two-speed or three-speed drill?
Two speeds cover most needs, but a three-speed gearbox like the DeWalt’s gives you a useful middle range for tasks that fall between delicate driving and full-torque boring.
How often should I replace a cordless drill battery?
Most lithium-ion batteries hold a usable charge for 2–4 years of regular shop use before capacity noticeably degrades, depending on charge cycles and storage habits.
Is it better to buy a bare tool or a kit with a battery and charger?
If you’re new to a battery platform, a kit is usually the better value since batteries and chargers are often the most expensive part of the setup. If you already own compatible batteries from the same brand, buying the bare tool saves money and avoids redundant chargers.
What drill bits do I need for woodworking?
At minimum, you need a set of brad-point bits in sizes from 1/8 to 3/8 inch, a set of forstner bits for larger holes (1/4 to 1-3/8 inch), and countersink bits for the screw sizes you use most. Standard twist bits fill in for general-purpose tasks and metal drilling.
How do I prevent wood from splitting when driving screws?
Always drill a pilot hole sized to the screw’s root diameter, especially near board ends and in hardwoods. For the most critical joints, drill a clearance hole through the top piece and a pilot hole in the bottom piece. Adding a countersink prevents surface splitting under the screw head.
Can I use a cordless drill as a substitute for a drill press?
For many tasks, yes — especially with a drill guide block or portable drill guide for perpendicularity. However, a drill press offers superior depth consistency, repeatability, and perpendicularity for production work or projects requiring dozens of identical holes.
What speed should I use for drilling forstner bits?
Always use the low-speed setting on your drill when running forstner bits. Large-diameter forstner bits (1 inch and above) in hardwood should be run at the slowest speed your drill offers. Clear chips frequently and let the bit cool between deep holes to prevent burning.
Should I own two cordless drills for my shop?
If you do regular assembly work, owning two drills saves significant time by eliminating constant bit swapping. Keep one loaded with a driver bit and one with a boring bit, or use a secondary budget drill like the Ryobi for lighter tasks while your primary handles the heavy work.
How do I know when my drill bits are dull?
Dull bits require noticeably more force to drill, produce rougher hole surfaces, and may burn the wood — especially in hardwoods. If you find yourself pressing harder than usual or the bit is producing smoke or dark discoloration, it’s time to sharpen or replace the bit.
What’s the difference between a pilot hole and a clearance hole?
A pilot hole is drilled at the screw’s root diameter and gives the threads something to grip. A clearance hole is drilled at the screw’s full thread diameter through the top piece of a joint, allowing the screw to pass through freely and only thread into the bottom piece, pulling the joint tight without splitting the top piece.
How loud is a cordless drill compared to other shop tools?
Cordless drills typically produce 75–90 decibels under load, making them significantly quieter than table saws (100+ dB), routers (95–110 dB), or impact drivers (100+ dB). Brushless models tend to run quieter than brushed equivalents.
Final Verdict
For most woodworkers building a serious shop kit, the Milwaukee M18 2904 is our top recommendation — it strikes the best balance of torque, precision, and chuck accuracy without becoming unwieldy at the bench. If fine-grained control matters more to you than raw power, the DeWalt 20V MAX XR is an excellent alternative with its extra gear range and precise clutch. For long sessions where comfort is the priority, the Makita 18V LXT is hard to beat, and budget-conscious hobbyists will get real value from the Skil PWRCORE 20.
Whichever drill you choose, remember that the tool is only part of the equation — a well-organized shop with the right complementary tools, from a solid workbench to a reliable random orbital sander, will do just as much for your results as the drill in your hand.
Ready to upgrade your shop? Our top overall pick, the Milwaukee M18 2904 Hammer Drill, is available now.
Check Price on Amazon