What Is a Rabbet in Woodworking? Definition, Uses, Tools, and Techniques
A rabbet is one of the simplest cuts in a woodworker’s repertoire, yet it quietly holds together drawers, cabinets, picture frames, and boxes. Here is what it is, why it works, and how to cut one cleanly.
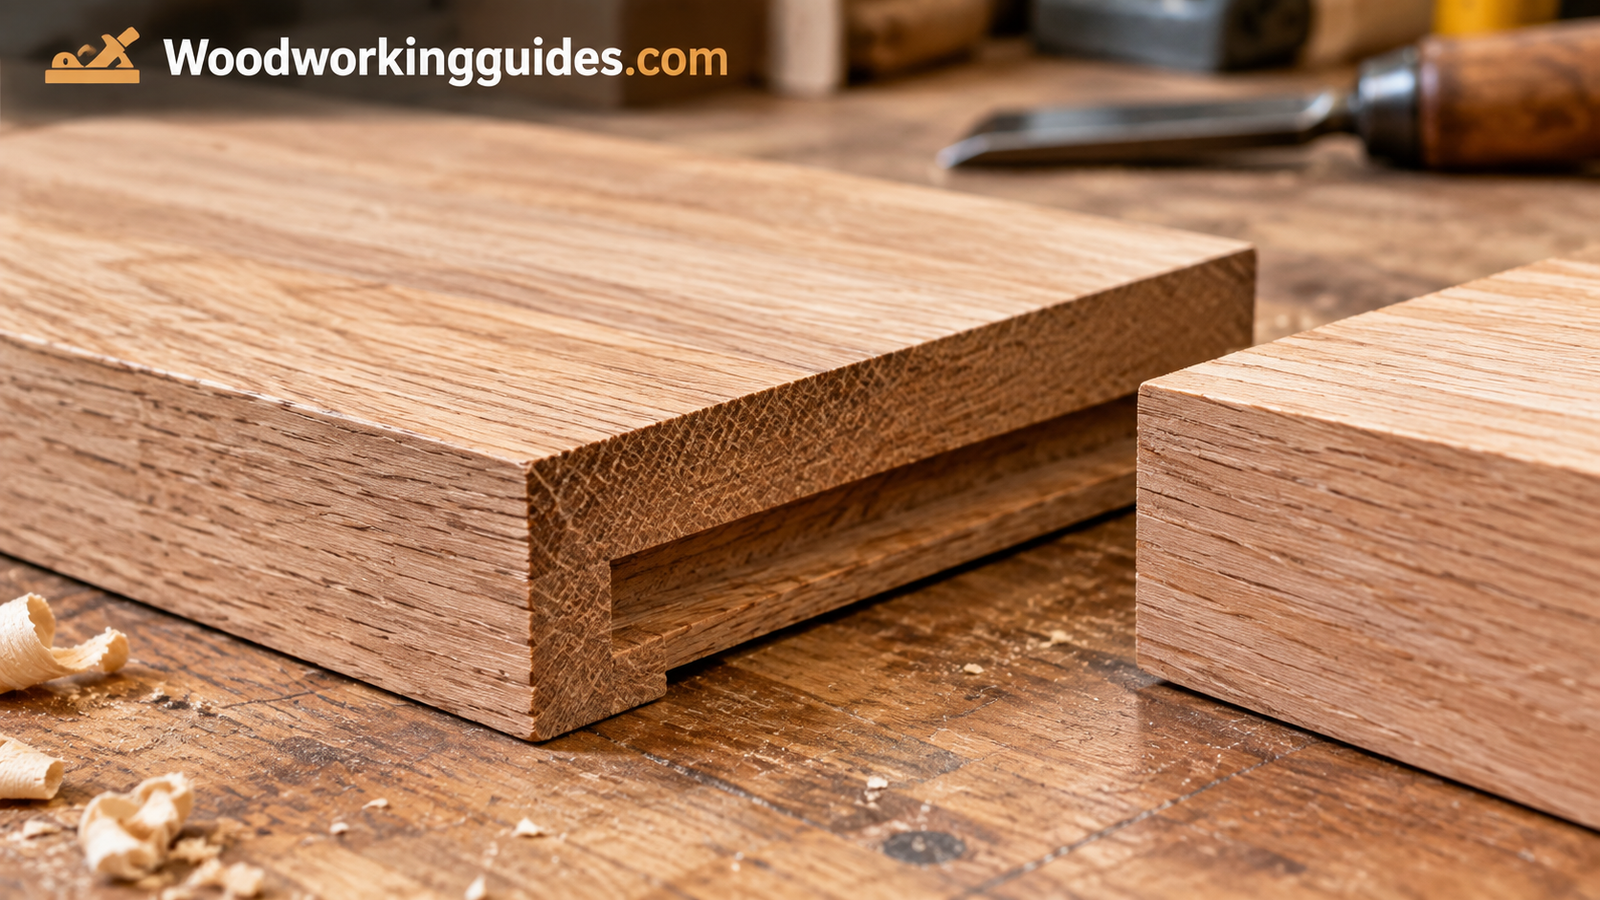
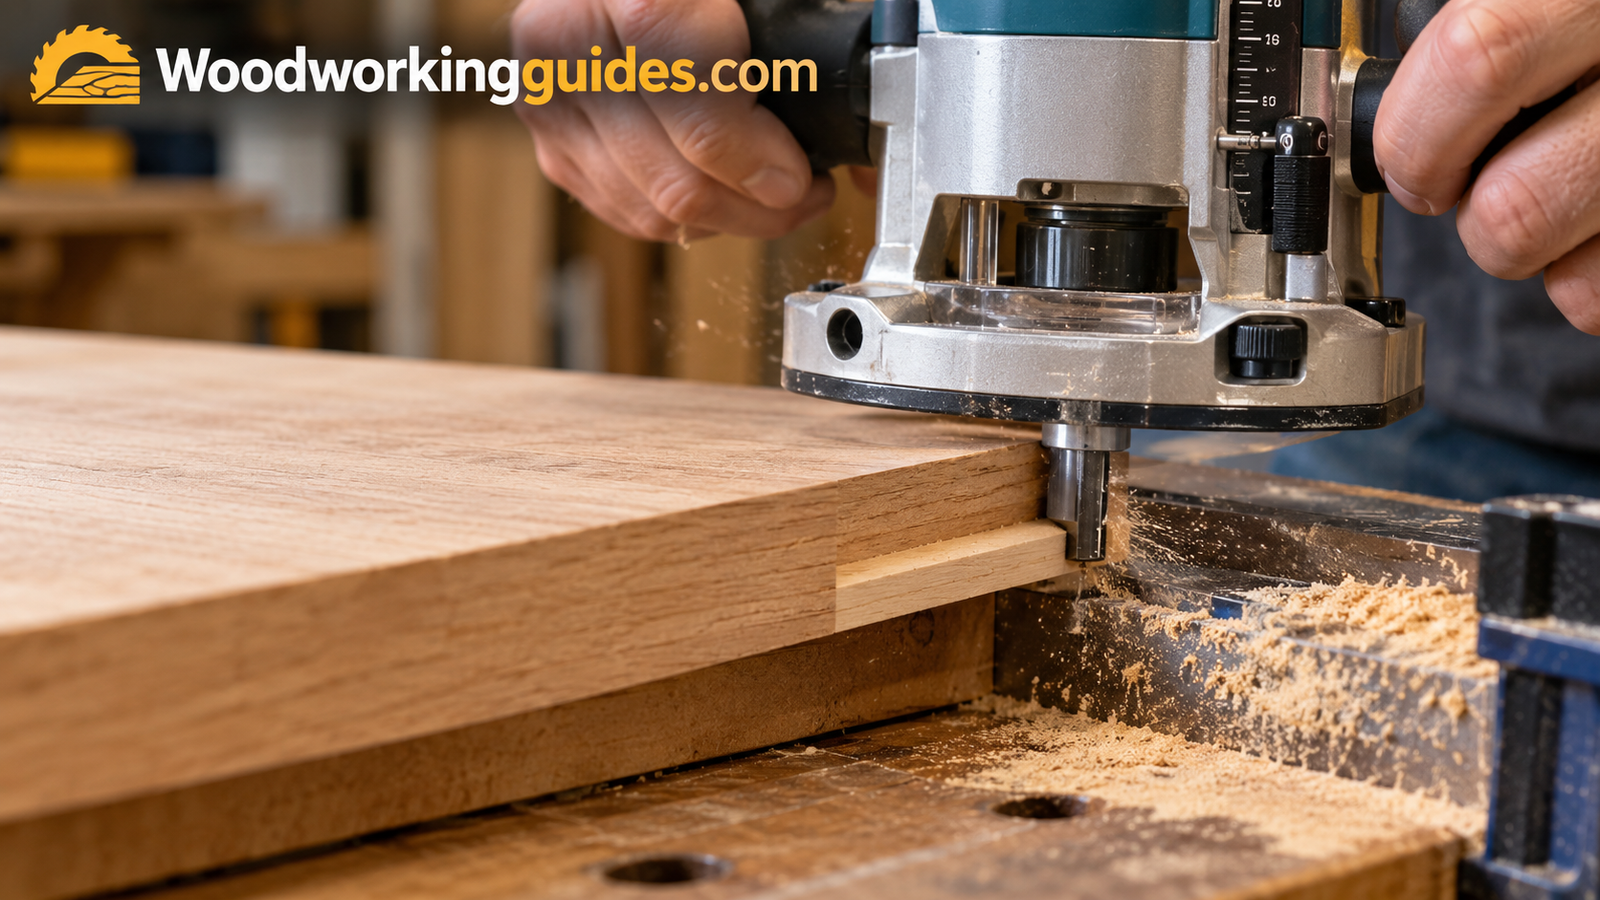
1. What Is a Rabbet in Woodworking?
A rabbet is a step-shaped recess cut along the edge or end of a board. Picture removing an L-shaped sliver of wood so the board has a shoulder and a ledge. Because one side is left open, a rabbet is sometimes called a “half-open” cut, and that open side is exactly what makes it so useful.
Woodworkers use rabbets to join two pieces at a corner, to seat a panel or a back, and to create a tidy lip for doors and lids. In some regions you will see it spelled “rebate,” but it is the same cut. If you are still getting your bearings in the craft, our overview of what woodworking is is a good companion read.
The word itself comes from old French and simply describes a notch beaten into an edge. That origin explains why the cut feels so basic: for centuries, joiners made rabbets with nothing more than a chisel and a saw. What has changed is the speed and consistency we get from modern tools, not the idea behind the cut.
Think of a rabbet as a seat. The ledge supports the mating piece, and the shoulder stops it from sliding sideways. Because the piece sits in the recess instead of resting on the surface, the joint is easier to align, easier to clamp, and much less likely to creep while the glue sets. That is the quiet advantage behind nearly every rabbet you will ever cut.
Beginners often ask whether a rabbet is a joint or just a cut. The honest answer is both. On its own, a rabbet is a cut that removes material. Paired with a second piece, it becomes a joint. A cabinet back sitting in a rabbet is a joint in practice, even though no other cut is involved. Understanding that distinction makes layout and planning a lot less confusing when you start designing your own projects.
2. Anatomy of a Rabbet
Every rabbet has three measurements worth knowing. The width is how far the cut extends in from the edge of the board’s face. The depth is how far it goes down into the thickness. The length is how far it runs along the edge.
The vertical wall is called the shoulder, and the flat floor is the ledge, sometimes called the rebate floor. A clean rabbet has a flat floor and a square shoulder. Even a slight angle in either one will show up as a gap when the mating piece is dropped in.
Layout starts with the mating piece. Hold it against the board and mark the exact thickness for the rabbet width, then mark depth from the face. Using the actual workpiece, instead of a number off a tape, removes measurement error and gives a tighter fit. Run a marking knife along the shoulder line so the fibers are severed before any tool touches them.
Grain direction matters just as much as dimensions. A rabbet cut along the grain is straightforward because the tool follows the fibers. A rabbet cut across end grain is more likely to splinter on the exit side, since nothing supports the fibers at the edge. Experienced woodworkers plan for this by cutting the end-grain rabbets first, clamping a scrap behind the cut, or scoring the line deeply so the tear-out stops at the knife mark.
Finally, check the floor and the shoulder with a small square. A rabbet with a slightly sloped floor will rock the mating piece, and a shoulder that leans will open a hairline gap on the visible face. Catching these flaws before glue saves a lot of frustration, and a few seconds with a square makes it routine.
It also helps to think about how the rabbet relates to the finished face of the piece. When the rabbet sits on the back or inside edge, small imperfections vanish from view, so you can work a little faster. When it sits on a visible edge, every ripple, burn mark, and gap shows. Plan the cut so the most critical surface falls on the least visible side, and save your slowest, most careful passes for the faces people will actually see.
3. Rabbet vs. Dado vs. Groove
These three cuts are easy to mix up because all of them remove a channel of wood. The difference is where the channel sits and which way it runs.
| Cut | Location | Open sides | Typical use |
|---|---|---|---|
| Rabbet | Along an edge or end | Two (one face, one edge) | Corners, back panels, lids |
| Dado | Across the grain, away from the edge | Open at both ends only | Shelves, dividers |
| Groove | With the grain, away from the edge | Open at one or both ends | Panel inserts, drawer bottoms |
If the dado is the cut you are curious about, we break it down in what is a dado in woodworking. The short version: a rabbet lives at the edge, while a dado and a groove live in from it.
A simple memory trick helps: a rabbet has a missing corner, while a dado has a missing middle. If you can see the profile of the cut from the end of the board and it looks like a stair step, it is a rabbet. If it looks like a slot with two walls, it is a dado or a groove.
The cuts also behave differently in a project. A dado carries a shelf or divider, and the walls on both sides give strong resistance to sagging. A groove captures a panel floating inside a frame so it can expand and contract with the seasons. A rabbet sits at the boundary of a piece, which is why it is the go-to choice for backs, lids, and corners where something needs to line up flush with an outer edge.
Many projects combine all three. A bookcase might use dadoes for the fixed shelves, a rabbet along the back edge for the panel, and a groove inside the door frames. Learning to see where each cut belongs is a big step toward designing furniture instead of only following plans. You will find the same logic echoed in the joinery overview linked above.
4. Types of Rabbet Joints
Standard (single) rabbet
One piece carries the rabbet and the other fits into it. This is the everyday version used for cabinet backs and basic box corners.
Double rabbet
Both mating pieces are rabbeted so they interlock. It offers extra glue surface and better alignment, and it hides end grain on one face.
Stopped rabbet
The cut stops short of the end of the board, so the rabbet is not visible from one side. It takes more care, because the cut has to start and finish at layout lines.
Rabbet and fillet
A small ledge is left on the rabbeted piece to give a decorative shadow line, common in furniture and frames.
Choosing among the types comes down to appearance, strength, and effort. A standard rabbet is the fastest and works for hidden corners. A double rabbet takes two setups but gives more glue surface and a neater look, since neither piece’s end grain is fully exposed. A stopped rabbet keeps the cut hidden from the front, which is the better option for visible furniture faces but needs a chisel to square the closed end.
There is also the through rabbet versus the blind rabbet. A through rabbet runs the whole length of the board and is simple to cut on any machine. A blind or stopped version leaves a wall at one end, so you need to start and stop at marked lines, or square the end by hand afterward. Some woodworkers prefer to cut a stopped rabbet on a router table with start and stop blocks clamped to the fence, which makes the result predictable and repeatable across several parts.
Another handy variation is the angled or beveled rabbet, used in some frame and trim work. It follows the same logic but tilts the floor or shoulder to match a mating bevel. It is less common in beginner projects, but worth knowing about as your work grows more refined.
5. Common Uses for Rabbets
- Cabinet backs: a rabbet along the rear edge lets a thin back panel sit flush inside the case.
- Drawer construction: the front is often rabbeted to receive the sides.
- Picture frames: a rabbet on the inner back edge holds glass, art, and backing.
- Boxes and lids: a rabbeted lip lets a lid sit in the opening instead of on top.
- Doors: overlay and inset door styles frequently use rabbets for a clean reveal.
- Bookcases: the top and sides can be joined with a rabbet to hide end grain.
Rabbets show up in far more projects than people expect, and they are often a first step toward more advanced work like the joinery covered in wood joinery tools explained.
Consider a drawer. The classic approach is to rabbet the front so the sides sit in it, then fasten from the sides. The front can then resist the pull of the handle without relying on end-grain glue alone. A similar approach works for small cases, tool trays, and shop boxes where speed matters more than showpiece joinery.
Frames offer another great example. A picture frame rabbet is cut along the back inner edge, and the glass, artwork, and backing board all sit inside it, held with points or turn buttons. The same cut appears in mirror frames, shadow boxes, and display cases. Because the rabbet is hidden from the front, the face of the frame stays clean and uninterrupted.
Rabbets are also helpful in repair and trim work. Door stops, window sashes, and baseboard returns often rely on rabbets to create reveals and seat panels. In shop projects, a rabbeted cleat or a rabbeted edge on a jig can make assembly faster and keep parts square. Once you start looking for them, you will see rabbets in almost every cabinet, box, and frame you handle.
6. How Strong Is a Rabbet Joint?
A rabbet gives more glue surface than a plain butt joint and a mechanical shoulder that resists racking in one direction. It is not as strong as a dovetail, though. Its weakness is that it can pull apart along the open side if it is stressed that way.
Pros
- Fast and easy to cut
- Self-aligning during glue-up
- More glue area than a butt joint
- Conceals end grain on one face
Cons
- Weaker than dovetails or box joints
- Open side can pull apart under load
- Needs reinforcement in heavy-duty builds
For anything that will carry weight, add brads, screws, or dowels. Pin nails work well for light boxes, while screws suit a bookcase or workshop cabinet.
The real strength of a rabbet joint depends on direction. Loaded so the shoulder bears against the mating piece, it is very capable. Loaded so the pieces are pulled apart along the open side, it relies only on glue and fasteners. That is why a rabbeted bookcase often performs well under shelf weight but needs reinforcement if the case might be dragged or racked.
Glue choice and surface prep also matter. Long-grain to long-grain glue joints are very strong, so a rabbet that exposes plenty of long grain bonds well. A rabbet that exposes mostly end grain is weaker, because end grain soaks up glue and bonds poorly. If your design puts the main glue surface on end grain, add screws, dowels, or a spline for security.
For a quick strength boost, consider a pocket of dowels through the shoulder, or a few countersunk screws plugged with matching wood. A thin strip of plywood or a corner block glued inside a box also helps. These details are invisible in the finished piece but make the difference between a box that lasts a decade and one that loosens in a year.
7. Cutting a Rabbet with a Router
A router is the most popular rabbet tool because it is accurate and repeatable. A rabbeting bit has a bearing that rides the edge of the board and sets the cut width, and interchangeable bearings let you change the width without changing bits. A straight bit with an edge guide or fence works too, and gives you more control over width. If you are new to the tool, start with what a woodworking router is used for, then browse our top wood router picks.
Take the cut in several light passes, especially in hardwood, and always move the router against the bit’s rotation (a climb cut risks grabbing). Cut end grain first, then long grain, so any tear-out is removed by the second cut.
Setup is straightforward. Choose a rabbeting bit with a bearing that gives the width you want, and set the depth by raising the bit until the cutter reaches the desired shoulder height. Make a test cut in scrap, check it against the mating piece, and adjust. The bearing rides the edge of the board, so the edge itself must be straight and clean or the rabbet will follow every wobble.
For wider rabbets, use a straight bit and a fence, or take several passes with a larger bearing. For safety and a smooth finish, never remove more than a small amount per pass. In hardwoods, take about an eighth of an inch of depth at a time. Keep both hands on the router, hold it flat on the surface, and move at a steady pace so the bit does not burn the wood.
A router table is the better choice for small parts. The fence and featherboards hold the board in place, and your hands stay farther from the bit. Use a push block for narrow stock and a sacrificial backer on the fence for end grain. With a good setup, you can run dozens of identical rabbets in minutes, and each one will match the last.
Dust and chip management matter here too. Chips packed into the corner of the rabbet can lift the router base and change the depth mid-cut, so clear the path often or connect a vacuum hose to the router or fence. Wear eye and ear protection, and a dust mask, since routing produces fine particles. A clean cut area gives a cleaner rabbet and a safer working environment.
8. Cutting a Rabbet on a Table Saw
A table saw can cut a rabbet in two passes. First, stand the board on its edge or face and cut the shoulder to depth. Second, make the cheek cut so the waste falls free. Take care that the waste does not get trapped between the blade and the fence, where it can kick back. Using a sacrificial fence or a dado stack helps for wider cuts. If you do not own one yet, read how to choose a table saw and check the best table saw for woodworking.
Setting up a table saw rabbet starts with the blade height. For the first cut, raise the blade to the depth of the rabbet and set the fence so the blade sits at the shoulder line, with the board lying flat. For the second cut, stand the board on edge, lower the blade to the width of the rabbet, and cut to the shoulder. Done in this order, the offcut falls to the outside of the blade instead of being trapped against the fence.
A dado stack makes wide rabbets easy because a single pass removes the waste. Attach a wood auxiliary fence to the rip fence and let the stack cut a notch into it, so the blade can run right at the edge without damaging the metal fence. Make sure your saw’s throat plate and arbor length are rated for the stack, and follow the manufacturer’s guidance on width.
Whatever method you use, avoid freehand cuts, and keep the board pressed against the fence and table. Use featherboards to hold the stock, and a push stick for the last few inches. A table saw is powerful and unforgiving, so patience and a steady setup always beat speed. If something feels wrong, stop, unplug, and rethink the setup before trying again.
If your saw produces a slightly rough floor, do not worry. Table saw blades leave faint ridges, which are normally fine for glued joints, though a flat-top grind blade or a quick pass with a shoulder plane cleans them nicely. For visible rabbets, choose a blade designed for ripping or a dedicated dado set that leaves a flat floor, and check the results on scrap before committing to the good stock.
9. Hand Tool Methods
You do not need a shop full of machines. A rabbet plane, shoulder plane, or a moving fillister plane cuts clean rabbets with a fence and depth stop. A marking gauge scores the shoulder, and a chisel cleans the corners. Hand tools are quiet, safe, and satisfying, though slower on long runs. For a broader comparison, see hand tools vs. power tools for woodworking, and pick up a set from our best chisel set for beginners list.
A rabbet plane has a blade that runs the full width of the sole, so it can cut right into the corner. A shoulder plane works similarly and is also great for cleaning up joints. A moving fillister plane adds a fence and a depth stop, which makes cutting uniform rabbets almost as easy as with a machine. If you are starting from a clean slate, a good shoulder plane is one of the most versatile hand tools you can own.
The technique is simple. Strike the shoulder line with a marking gauge, then chisel a small starter groove along the waste side so the plane has a track. Take light strokes, check the depth often, and keep the plane square to the face. As the rabbet deepens, the plane’s fence or a clamped batten keeps the width consistent.
Hand-cut rabbets have a different feel from machine-cut ones. The surfaces are crisp and slightly burnished from the blade, and you can fit them with real precision. Many woodworkers use a combination of methods, roughing out waste on a machine and finishing with a plane for a perfect fit. It is a pleasant way to build skill and learn how wood behaves under a sharp edge.
10. Choosing Wood and Sizing Your Rabbet
Hardwoods like maple and oak hold a crisp shoulder, while softwoods can crush or tear, so go gently and use sharp tooling. Plywood is ideal for cabinet backs but its veneer can chip, so score the line first.
| Project | Typical rabbet depth | Typical width |
|---|---|---|
| Cabinet back (1/4″ panel) | 3/8″ | 1/4″ |
| Drawer corner | Half the thickness | Thickness of mating piece |
| Picture frame | Glass + backing thickness | 3/8″ to 1/2″ |
| Box lid | Half the thickness | Half the thickness |
The width of a corner rabbet should equal the thickness of the piece that fits into it. Test on scrap first and sneak up on the final fit.
Species matters more than people expect. Dense hardwoods like maple, cherry, and walnut cut cleanly and hold a crisp shoulder, but they punish dull tooling. Softer woods like pine and poplar are easy to cut but crush at the edges, so take lighter passes. Open-grained species like oak may tear at the exit side, so score the line or use a backer.
Moisture content also plays a role. A board that is too wet will shrink after assembly and open the joint, while one that is too dry may swell in a humid room. Let your lumber acclimate in your shop for a few days before milling, and aim for stable, flat stock. A warped board will give an uneven rabbet no matter how careful you are.
Plywood deserves its own mention. Cabinet-grade plywood is stable and ideal for backs, but its thin face veneers chip easily. A sharp bit, a slow feed, and a scoring pass help. Remember that plywood’s actual thickness is often slightly under its nominal size, so measure your sheet and cut the rabbet to fit the real thickness, not the label on the stack.
Grain figure is the last factor worth considering. Highly figured woods like curly maple or birdseye can tear unpredictably, because the fibers change direction within a single board. Light passes, sharp cutters, and a slow feed rate help considerably. If tear-out still shows up, a few strokes with a sharp plane or a scraper will usually clean the ledge, and a light sanding block takes care of the rest without rounding the crisp shoulder.
11. Common Rabbet Mistakes to Avoid
- Cutting too deep: leaves a thin, fragile wall that snaps.
- Skipping test cuts: a scrap piece prevents costly errors on good stock.
- Tear-out on exit: use a backer board or cut end grain first.
- Dull bits and blades: burn and rough walls make weak glue bonds.
- Sloppy depth settings: a floor that is not flat leaves gaps.
- Forgetting dust control: chips under the workpiece throw off depth.
Most rabbet problems trace back to setup, not skill. A bit that is slightly loose can creep deeper during the cut. A fence that is not locked down can drift. A board that is not held flat can tilt and cut a sloped floor. Before every cut, double-check the settings and the clamps, and make a test pass in scrap.
Another common mistake is rushing the fit. A rabbet that is a hair too tight can be adjusted with a few passes of a shoulder plane or a sanding block, while one that is too loose cannot be fixed. Always sneak up on the final dimension, and test as you go. If a joint is already sloppy, a thin shim or a bead of filler glue can help, but it will never be as strong as a proper fit.
Finally, watch your finish plans. Glue squeeze-out in a rabbet corner is hard to remove, and it will block stain later. Wipe it up promptly with a damp cloth, or let it gel and pare it away with a chisel. A little care at glue-up saves hours at the finishing stage, and your rabbets will look as good as they perform.
One more trap is ignoring tool wear and bearing condition. A worn bearing on a rabbeting bit can bind or wobble, producing a ragged shoulder or an uneven width. Check bearings for smooth rotation, clean off pitch and resin, and replace anything that sticks. Cleaning bits with a dedicated cleaner keeps them cutting cooler and extends their life considerably.
12. Tools Worth Owning for Rabbet Work
You can cut rabbets with surprisingly little, but a few tools make the job easier. Our best woodworking tools roundup covers the essentials, and a solid surface matters too, so see the best woodworking workbench guide and setting up a beginner woodshop. If you are just starting out, how to start woodworking with no experience is the place to begin.
| Tool | Best for | Skill level |
|---|---|---|
| Router with rabbeting bit | Repeatable edge rabbets | Beginner |
| Table saw / dado stack | Long, wide rabbets | Intermediate |
| Rabbet or shoulder plane | Fine fitting, hand work | Intermediate |
| Chisel set | Cleaning corners | Beginner |
If you are building a toolkit for rabbet work, start with the basics and add as your projects grow. A sharp marking knife and a combination square cost little and improve accuracy immediately. A router with a rabbeting bit set handles most edge work, and a decent chisel set cleans up corners. Add a shoulder plane for refinement, and a table saw with a dado stack if you cut a lot of joinery.
Do not overlook support equipment. A stable workbench, good clamps, and dust collection all make rabbet cutting safer and more accurate. A flat bench lets you hold boards securely, and clamps keep them from shifting during cuts and glue-ups. A shop vacuum keeps chips off the work surface, where they can ruin a fit.
Finally, invest in sharpening. A dull blade or bit tears the wood, burns the edge, and makes every cut harder. A simple sharpening kit for chisels and plane irons pays off quickly, and fresh router bits are worth replacing when they lose their edge. Quality tooling is not about spending the most, it is about keeping what you own in cutting condition.
Finally, build your setup around the work you actually do. A person making picture frames needs fine measuring tools and a small router table, while someone building cabinets needs a dado setup and a solid way to handle sheet goods. Buy for the next project, not the hypothetical one, and let your needs guide the upgrades. Over time, you will build a kit that matches how you work and the pieces you enjoy making most.
Frequently Asked Questions
What is a rabbet in woodworking?
A rabbet is an L-shaped recess cut along the edge or end of a board, leaving a shoulder and a ledge. Woodworkers use it to join corners, seat panels such as cabinet backs, and create lips for lids and doors. It is one of the simplest joinery cuts, and it is often the first one beginners learn.
How do you pronounce rabbet?
Most woodworkers say “RAB-it,” rhyming with “habit,” while others say “rah-BAY,” closer to the French. Both are understood in the shop, and neither is wrong. In some regions, the cut is called a rebate instead, which is pronounced “REE-bate” and describes exactly the same thing.
Is a rabbet the same as a rebate?
Yes, they are two names for the same cut. “Rebate” is the more common term in British, Australian, and some Commonwealth woodworking, while “rabbet” dominates in North America. Tool names follow the same pattern, so a rabbet plane may be sold as a rebate plane overseas.
What is the difference between a rabbet and a dado?
A rabbet is cut at the edge of a board, so one face and one edge are open. A dado is a channel cut across the grain away from the edge, with walls on both sides. Rabbets suit corners and back panels, while dadoes suit shelves and dividers.
Is a rabbet joint strong?
It is reasonably strong for its simplicity. The shoulder resists sliding and the larger glue surface beats a plain butt joint. It is weaker than a dovetail or box joint when pulled apart along the open side, so add brads, screws, or dowels when the piece will carry weight or take regular stress.
What tool is best for cutting a rabbet?
For most people, a router with a rabbeting bit is the best choice, because it is accurate, fast, and repeatable. A table saw with a dado stack works well for long runs, and a shoulder or rabbet plane suits hand-tool work. The right pick depends on your shop, the project size, and your comfort level.
Can you cut a rabbet with a table saw?
Yes. Make one pass with the board flat to cut the shoulder depth, then a second pass with the board on edge to free the waste. A dado stack can remove the whole rabbet in one pass. Always use the fence, a push stick, and featherboards, and never cut a rabbet freehand.
Can you cut a rabbet by hand?
Absolutely. A rabbet plane, shoulder plane, or moving fillister plane can cut clean rabbets with a marked line and a fence or depth stop. Score the shoulder with a marking gauge first, take light passes, and check the depth often. It is slower than machine work but quiet, safe, and very precise.
How deep should a rabbet be?
For joinery, a good guide is one half to two thirds of the board’s thickness, which leaves enough material for strength. For cabinet backs, match the depth to the panel and any retainer you plan to use. Frame rabbets should equal the thickness of the glass, artwork, and backing combined.
What is a rabbet used for in cabinets?
In cabinets, a rabbet along the rear edge of the case lets a thin back panel sit flush and square. Rabbets also join the top and sides, hide end grain, and seat drawer fronts. They add alignment during assembly and keep cabinets from racking without extra hardware.
What is a stopped rabbet?
A stopped rabbet ends before it reaches the end of the board, so the cut is hidden from one side. It looks cleaner on visible faces but needs more care, since you must start and stop at marked lines. A chisel is usually needed to square the closed end of the cut.
Should I glue and nail a rabbet joint?
Yes, in most cases. Glue forms the main bond, and brads, pin nails, or screws hold the pieces tight while it cures. For heavy-duty projects, use screws or dowels as permanent reinforcement. Wipe off squeeze-out promptly so it does not interfere with stain or finish later.
Conclusion
A rabbet is a simple step cut with a big job: it aligns, hides end grain, and gives panels and lids a place to rest. Master it with a router, a table saw, or a plane, test on scrap, and reinforce where strength counts. Once rabbets feel natural, you will spot places to use them in nearly every project.
Whether you are building a simple shop box or a refined piece of furniture, the rabbet is a skill you will use again and again. Practice on scrap, learn the feel of each tool, and treat every fit as a chance to improve.
As your confidence grows, experiment with variations like stopped, double, and angled rabbets, and notice how each changes the strength and look of a piece. The more you cut, the more you will understand how wood responds to the tool, and the faster you will spot the best choice for each job. Keep your tooling sharp, your layout precise, and your fits snug, and this humble cut will keep rewarding you across every project you build.